第八天笔记
自定义控件的实现
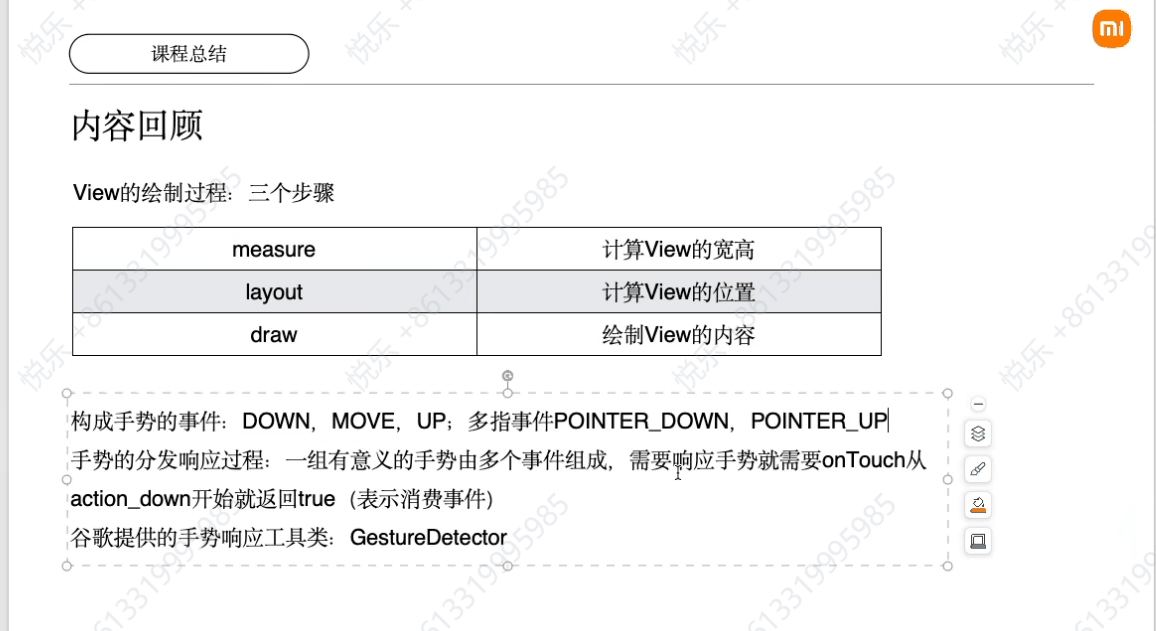
View 绘制过程
Activity 和 View 的关系
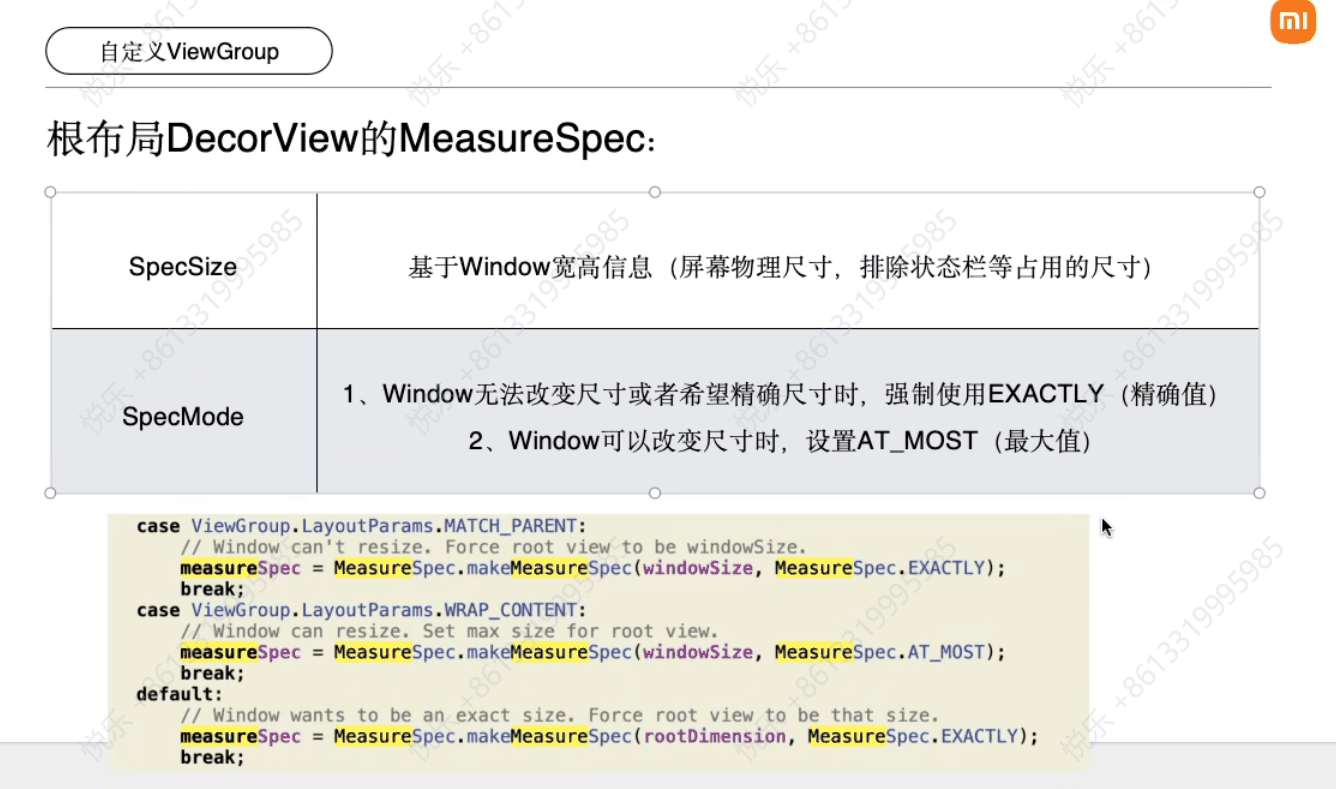
- Window 类:负责在
Activity中展示内容(具体实现为PhoneWindow类) - DecorView:
Window创建出根布局DecorView(继承自FrameLayout)
单个 View 的绘制步骤
系统根据布局树完成界面绘制,单个 View 需要经过三个步骤:
- 计算 View 的宽高:
measure - 计算 View 的位置:
layout - 绘制 View 的内容:
draw
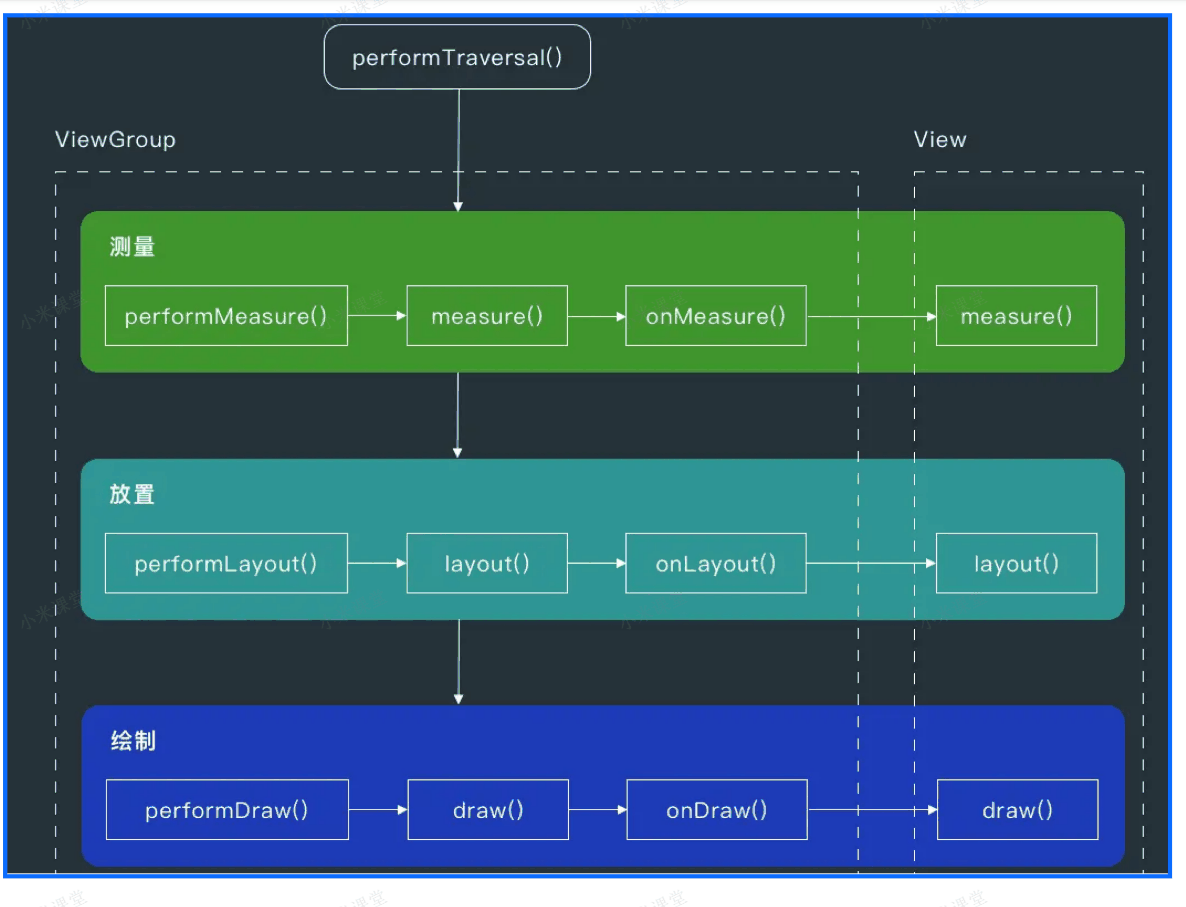
布局树逐级向下调用
布局树的绘制过程从上到下逐级调用,具体步骤如下:
- 测量:
performMeasure()measure()onMeasure()
- 布局:
performLayout()layout()onLayout()
- 绘制:
performDraw()draw()onDraw()
视图树调用流程图
位置的描述依赖坐标系
- Android 的坐标系定义为:
- 屏幕的左上角为坐标原点
- 向右为 x 轴增大方向
- 向下为 y 轴增大方向
自定义 View
draw 函数
-
作用:绘制内容在给定的 Canvas 上
-
调用时机:要保证 layout 之后再调用这个方法
-
注意事项:自定义 View 时考虑优先重写 onDraw 方法而不是这个方法
-
继承关系:如果一定要重写 draw 方法,要记得调用父类方法
-
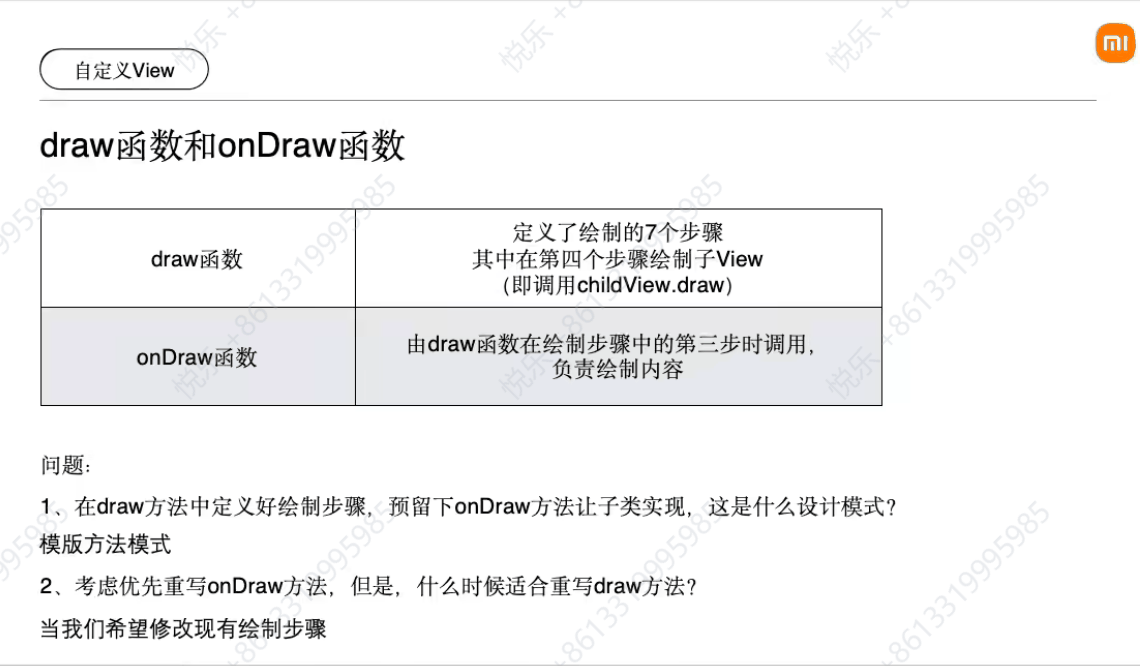
实现步骤:有 7 个绘制步骤:
- 绘制背景
- 其余步骤依次类推
位置的描述依赖坐标系
- Android 的坐标系定义为:
- 屏幕的左上角为坐标原点
- 向右为 x 轴增大方向
- 向下为 y 轴增大方向
draw 函数
-
作用:绘制内容在给定的 Canvas 上。
-
调用时机:要保证 layout 之后再调用这个方法。
-
注意事项:自定义 View 时考虑优先重写
onDraw方法而不是这个方法。 -
继承关系:如果一定要重写
draw方法,要记得调用父类方法。 -
实现步骤:有 7 个绘制步骤:
- 绘制背景
- 如有必要,保存画布图层以准备淡入淡出动画
- 绘制内容
- 绘制子 View(即调用
childView.draw) - 如有必要,绘制淡入淡出并恢复图层
- 绘制装饰(例如滚动条)
- 如有必要,绘制默认焦点高亮
/**
 * Manually render this view (and all of its children) to the given Canvas.
 * The view must have already done a full layout before this function is
 * called. When implementing a view, implement
 * {@link #onDraw(android.graphics.Canvas)} instead of overriding this method.
 * If you do need to override this method, call the superclass version.
 *
 * @param canvas The Canvas to which the View is rendered.
 */
@CallSuper
public void draw(Canvas canvas) {
    final int privateFlags = mPrivateFlags;
    mPrivateFlags = (privateFlags & ~PFLAG_DIRTY_MASK) | PFLAG_DRAWN;

    /*
     * Draw traversal performs several drawing steps which must be executed
     * in the appropriate order:
     *
     *      1. Draw the background
     *      2. If necessary, save the canvas' layers to prepare for fading
     *      3. Draw view's content
     *      4. Draw children
     *      5. If necessary, draw the fading edges and restore layers
     *      6. Draw decorations (scrollbars for instance)
     *      7. If necessary, draw the default focus highlight
     */
}
onDraw 函数
- 调用时机:在 7 个绘制步骤中的第三步。
- 实现:绘制内容。
protected void onDraw(Canvas canvas) {
    // Step 1, draw the background, if needed
    int saveCount;
    drawBackground(canvas);

    // skip step 2 & 5 if possible (common case)
    final int viewFlags = mViewFlags;
    boolean horizontalEdges = (viewFlags & FADING_EDGE_HORIZONTAL) != 0;
    boolean verticalEdges = (viewFlags & FADING_EDGE_VERTICAL) != 0;

    if (!verticalEdges && !horizontalEdges) {
        // Step 3, draw the content
        onDraw(canvas);
    }
}
绘制内容在给定的 Canvas 上
Canvas 类:Android 中用于绘制图形的重要类。它包含了许多绘图方法,主要可以分为以下几类:
| 绘制基本的几何形状,如矩形、圆形、椭圆等 | 使用路径(Path)定义复杂的图形 |
|---|---|
| drawRect(RectF rect, Paint paint) | drawPath(Path path, Paint paint) |
| drawCircle(float cx, float cy, float radius, Paint paint) | |
| drawOval(RectF oval, Paint paint) |
| 用于在画布上绘制文本 | 绘制位图图像 |
|---|---|
| drawText(String text, float x, float y, Paint paint) | drawBitmap(Bitmap bitmap, float left, float top, Paint paint) |
设置绘制的颜色和样式
- drawColor(int color): 设置绘制的颜色
- drawPaint(Paint paint): 设置绘制的样式
对画布进行变换
- translate(float dx, float dy): 平移变换
- rotate(float degrees): 旋转变换
在画布上创建和操作图层,实现图层效果
- save(): 保存当前画布的状态
- restore(): 恢复之前保存的画布状态
Paint 类配合提供绘制参数
Paint paint = new Paint();
paint.setColor(Color.RED); // 设置颜色
paint.setTextSize(24); // 设置文字大小
paint.setTypeface(Typeface.create(Typeface.DEFAULT, Typeface.BOLD)); // 设置字体样式
paint.setStrokeWidth(2); // 设置绘制线条宽度
paint.setAntiAlias(true); // 启用抗锯齿
Path 类配合描述复杂图形
Path path = new Path();
path.moveTo(x: 100, y: 200); // 从当前位置移动到指定位置(不画线)
path.lineTo(x: 100, y: 200); // 从前点绘制一条线到指定点
RectF oval = new RectF(left: 100, top: 100, right: 300, bottom: 600); // 绘制圆线
path.arcTo(oval, startAngle: 100, sweepAngle: 180, forceMoveTo: true); // 绘制弧线
path.close(); // 连接当前点和起始点
自定义 ViewGroup
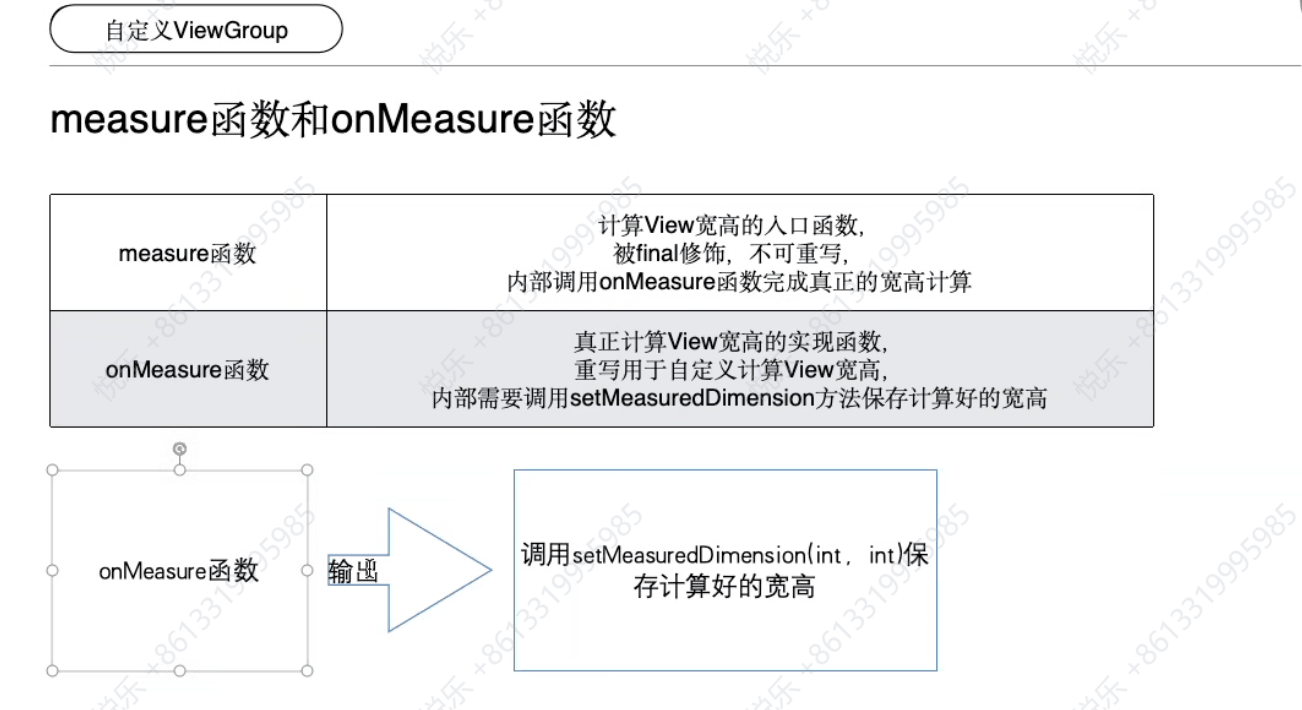
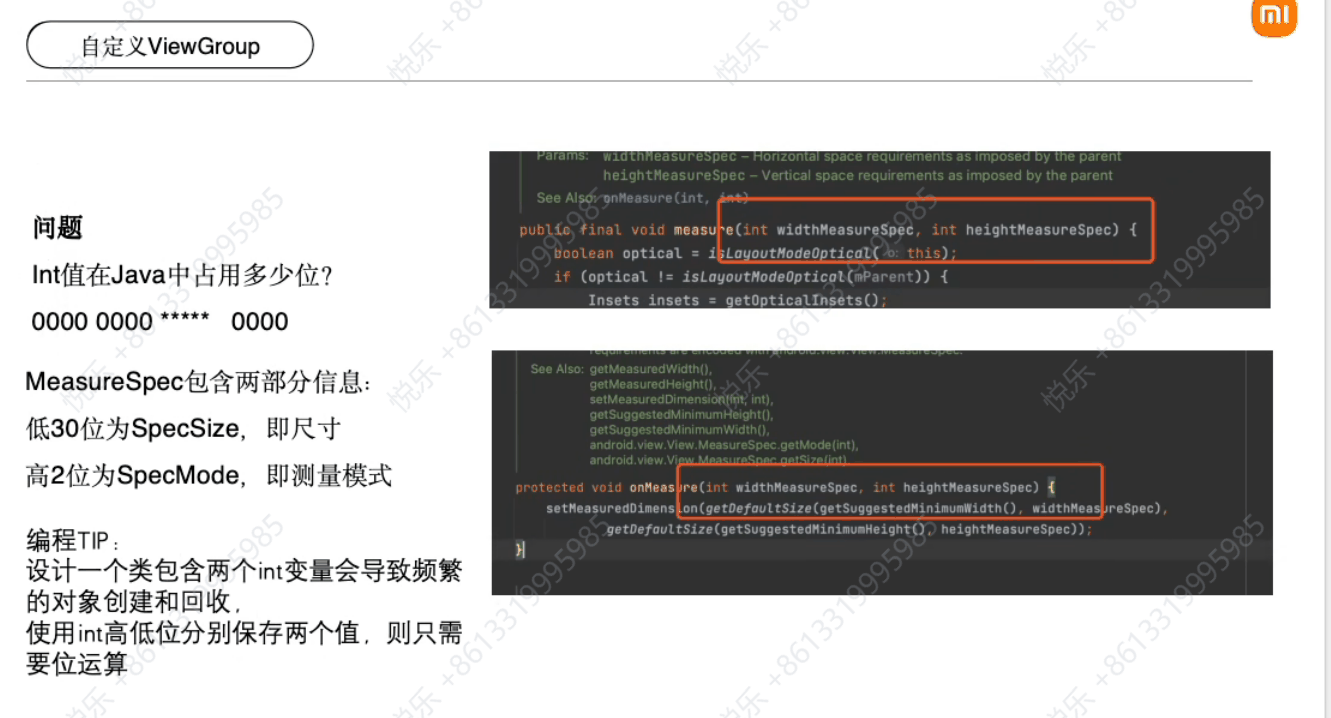
measure 函数
- 作用: 计算 View 的宽高
- 调用 onMeasure 完成真正的计算工作,且子类应该重写 onMeasure
- final 修饰该方法,不可重写
public final void measure(int widthMeasureSpec, int heightMeasureSpec) {
    boolean optical = isLayoutModeOptical() != this;
    if (optical != isLayoutModeOptical(mParent)) {
        // ... 相关代码
    }
}
onMeasure 函数
- 作用: 计算 View 的宽高,应由子类重写,以提供对其内容的准确有效的测量。
- 约定: 重写此方法时,必须调用
setMeasuredDimension(width, height)来存储测量好的宽度和高度。 - 没有 final 修饰符,可重写
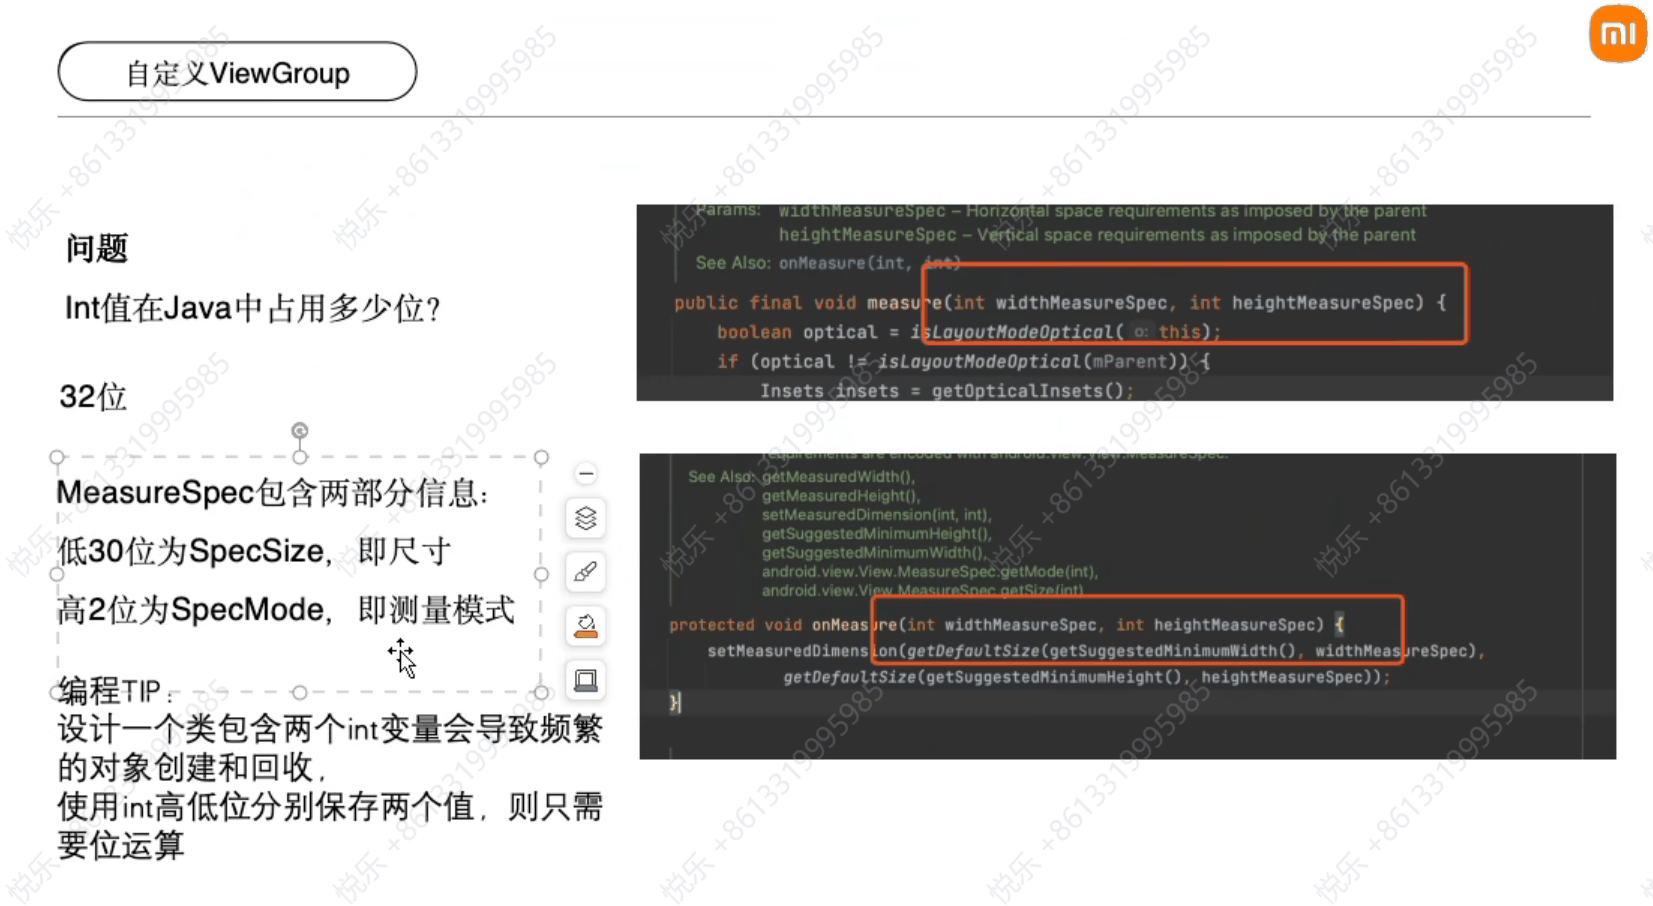
protected void onMeasure(int widthMeasureSpec, int heightMeasureSpec) {
    setMeasuredDimension(getDefaultSize(getSuggestedMinimumWidth(), widthMeasureSpec),
                         getDefaultSize(getSuggestedMinimumHeight(), heightMeasureSpec));
}
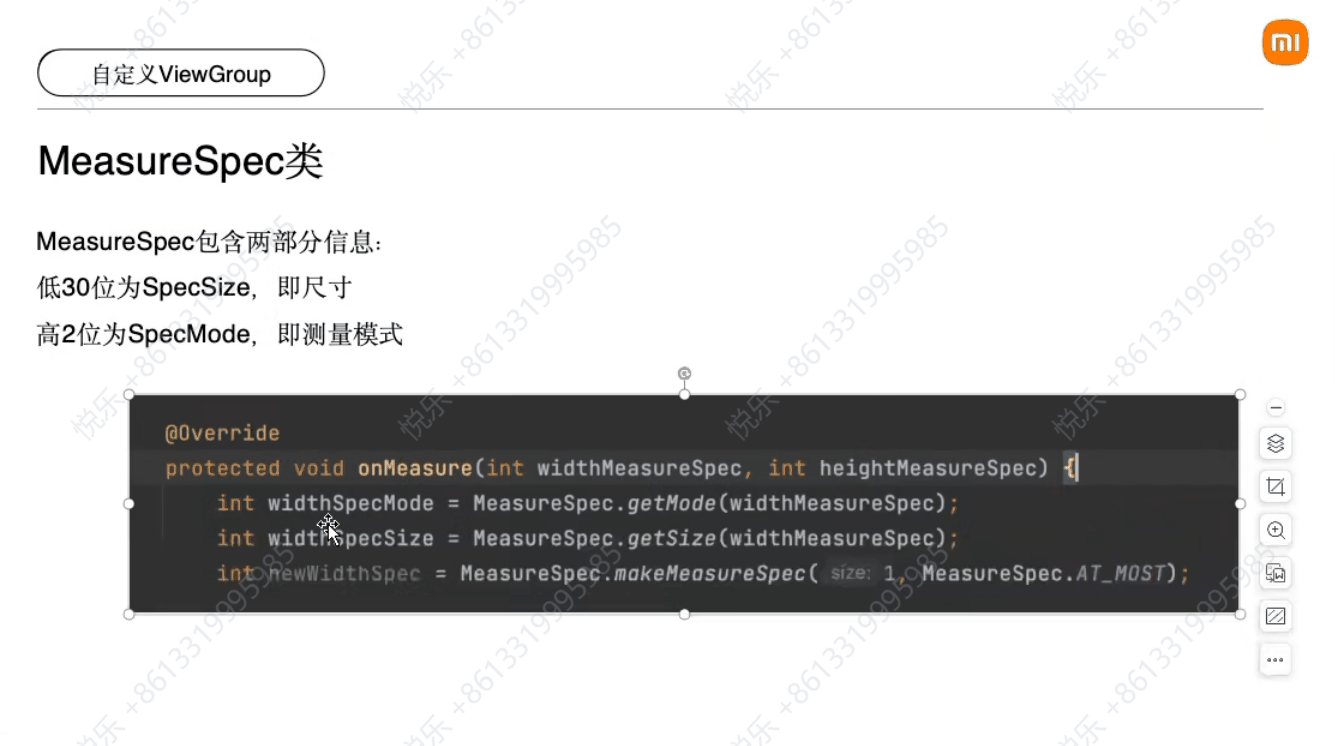
MeasureSpec 类
MeasureSpec 包含两部分信息:
- 低 30 位为 SpecSize,即尺寸
- 高 2 位为 SpecMode,即测量模式
@Override
protected void onMeasure(int widthMeasureSpec, int heightMeasureSpec) {
    int widthSpecMode = MeasureSpec.getMode(widthMeasureSpec);
    int widthSpecSize = MeasureSpec.getSize(widthMeasureSpec);
    int heightSpecMode = MeasureSpec.getMode(heightMeasureSpec);
    int heightSpecSize = MeasureSpec.getSize(heightMeasureSpec);

    int newWidthSpec = MeasureSpec.makeMeasureSpec(1, MeasureSpec.AT_MOST);
}
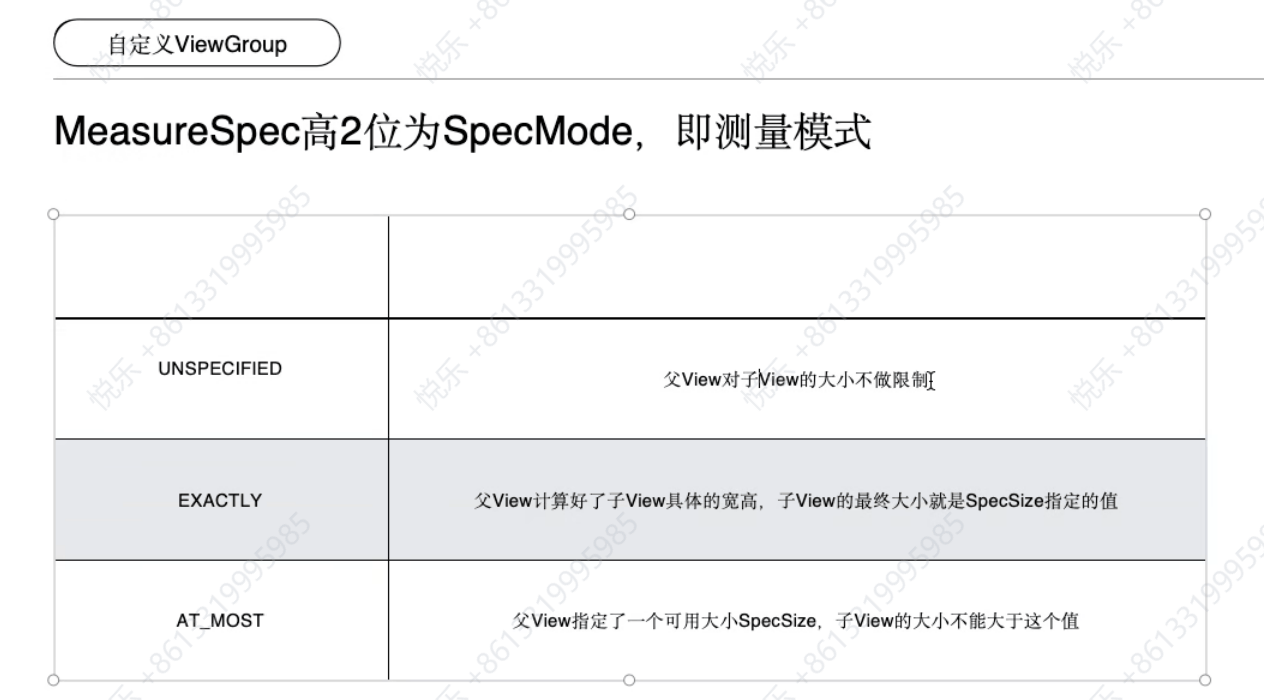
MeasureSpec 高 2 位为 SpecMode,即测量模式
| 测量模式 | 说明 |
|---|---|
| UNSPECIFIED | 父 View 对子 View 的大小不做限制 |
| EXACTLY | 父 View 计算好了子 View 具体的宽高,子 View 的最终大小就是 SpecSize 指定的值 |
| AT_MOST | 父 View 指定了一个可用大小 SpecSize,子 View 的大小不能大于这个值 |
onMeasure 函数
- 作用: 计算 View 的宽高,应由子类重写,以提供对其内容的准确有效的测量。
- 约定: 重写此方法时,必须调用
setMeasuredDimension(width, height)来存储测量好的宽度和高度。 - 没有 final 修饰符,可重写
protected void onMeasure(int widthMeasureSpec, int heightMeasureSpec) {
    setMeasuredDimension(getDefaultSize(getSuggestedMinimumWidth(), widthMeasureSpec),
                         getDefaultSize(getSuggestedMinimumHeight(), heightMeasureSpec));
}
MeasureSpec 类
MeasureSpec 包含两部分信息:
- 低 30 位为 SpecSize,即尺寸
- 高 2 位为 SpecMode,即测量模式
@Override
protected void onMeasure(int widthMeasureSpec, int heightMeasureSpec) {
    int widthSpecMode = MeasureSpec.getMode(widthMeasureSpec);
    int widthSpecSize = MeasureSpec.getSize(widthMeasureSpec);
    int heightSpecMode = MeasureSpec.getMode(heightMeasureSpec);
    int heightSpecSize = MeasureSpec.getSize(heightMeasureSpec);

    int newWidthSpec = MeasureSpec.makeMeasureSpec(1, MeasureSpec.AT_MOST);
}
MeasureSpec 高 2 位为 SpecMode,即测量模式
| 测量模式 | 说明 |
|---|---|
| UNSPECIFIED | 父 View 对子 View 的大小不做限制 |
| EXACTLY | 父 View 计算好了子 View 具体的宽高,子 View 的最终大小就是 SpecSize 指定的值 |
| AT_MOST | 父 View 指定了一个可用大小 SpecSize,子 View 的大小不能大于这个值 |
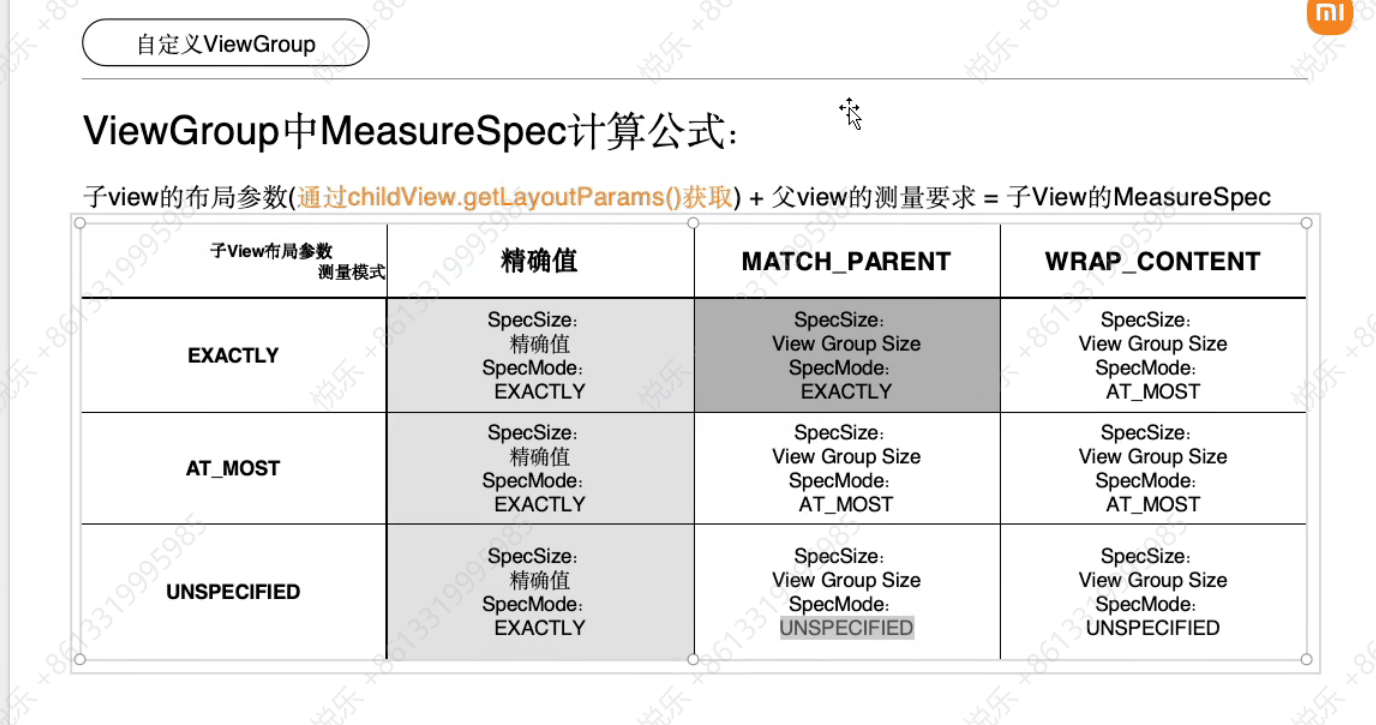
ViewGroup 中 MeasureSpec 计算公式
子 View 的布局参数(通过 childView.getLayoutParams() 获取) + 父 View 的测量要求 = 子 View 的 MeasureSpec
| 测量模式 | 精确值 | MATCH_PARENT | WRAP_CONTENT |
|---|---|---|---|
| EXACTLY | SpecSize: View Group Size SpecMode: EXACTLY |
SpecSize: View Group Size SpecMode: EXACTLY |
SpecSize: View Group Size SpecMode: AT_MOST |
| AT_MOST | SpecSize: View Group Size SpecMode: AT_MOST |
SpecSize: View Group Size SpecMode: AT_MOST |
SpecSize: View Group Size SpecMode: AT_MOST |
| UNSPECIFIED | SpecSize: 0 SpecMode: UNSPECIFIED |
SpecSize: 0 SpecMode: UNSPECIFIED |
SpecSize: 0 SpecMode: UNSPECIFIED |
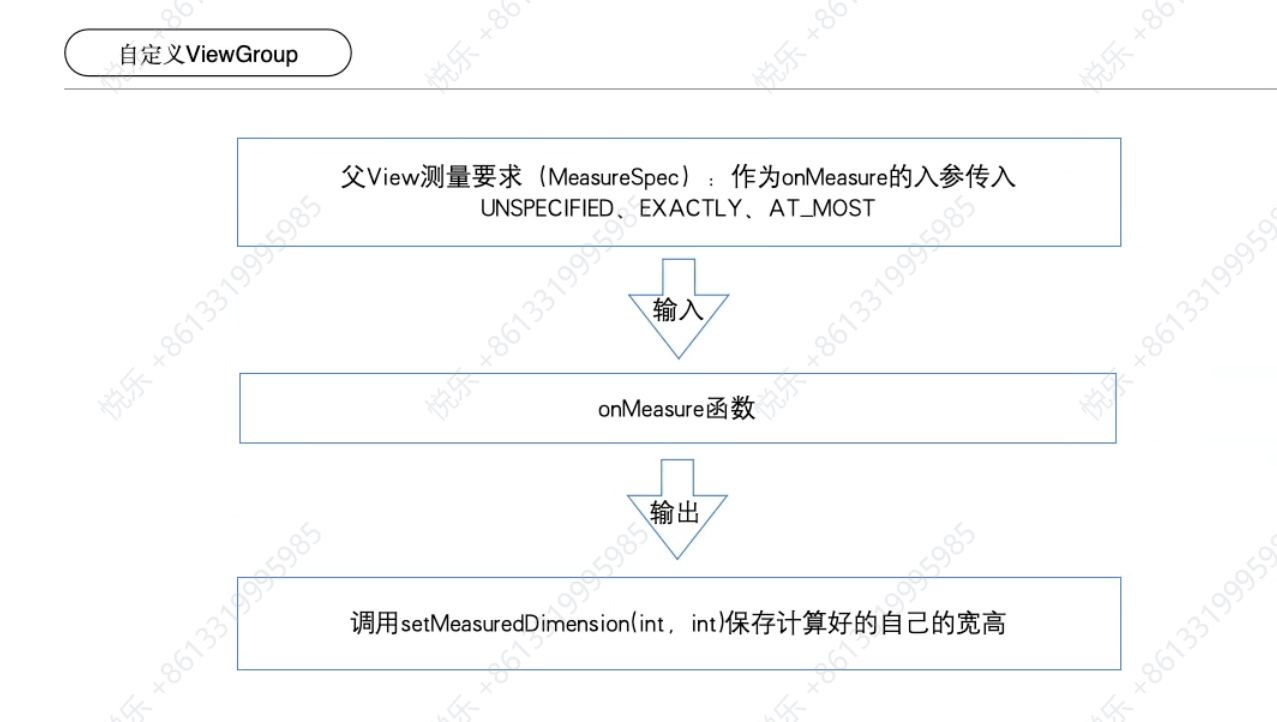
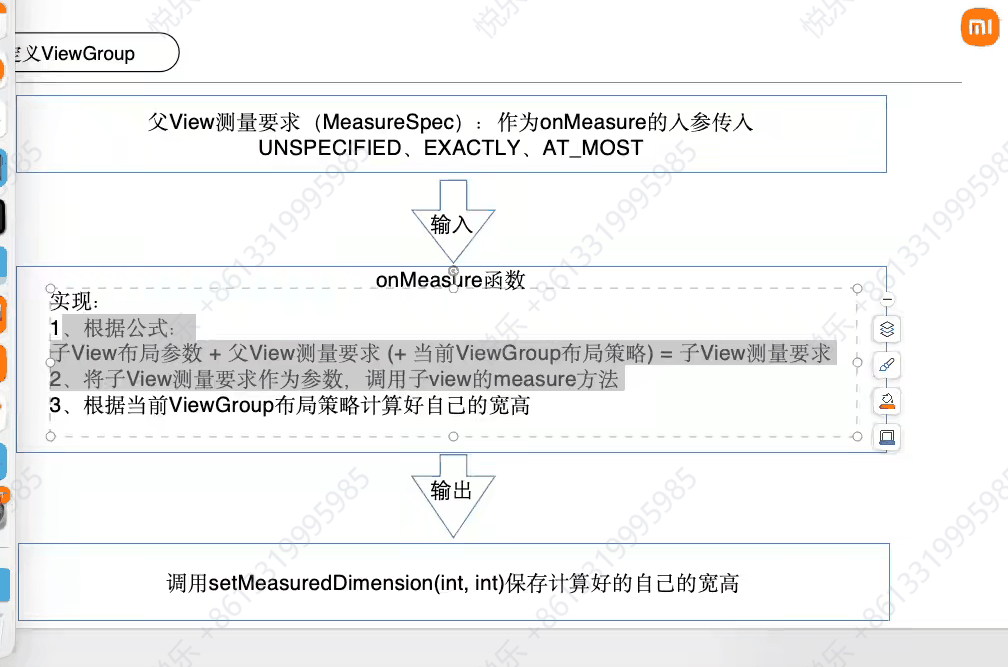
onMeasure 函数实现
- 父 View 测量要求(MeasureSpec)作为
onMeasure的入参传入:UNSPECIFIED, EXACTLY, AT_MOST - 实现:
- 根据公式:子 View 布局参数(+ 父 View 测量要求)= 子 View 测量要求
- 将子 View 测量要求作为参数,调用子 View 的
measure方法 - 根据当前 ViewGroup 布局策略计算自己的宽高
- 调用
setMeasuredDimension(int, int)保存计算好的宽高

layout 函数
- 布局机制的第二阶段(第一阶段是测量)
- 作用: 给所有子 View 分配位置
- 实现: 在这个阶段,每个父 View 调用其所有子 View 的
layout方法来确定它们的位置。 - 派生类不应覆盖此方法,子 View 的派生类应覆盖
onLayout方法。
public void layout(int l, int t, int r, int b) {
    if ((mPrivateFlags & PFLAG3_MEASURE_NEEDED_BEFORE_LAYOUT) != 0) {
        onMeasure(mOldWidthMeasureSpec, mOldHeightMeasureSpec);
        mPrivateFlags3 &= ~PFLAG3_MEASURE_NEEDED_BEFORE_LAYOUT;
    }
    ...
}
onLayout 函数
- 被
layout方法调用 - 作用: 为该 View 的子 View 分配位置
- 有子 View 的派生类应重写该方法,并对每个子 View 调用
layout方法,通常是使用在测量过程中存储的子 View 尺寸来完成的。
. onLayout 方法
- 定义:在
layout被调用时,分配每个子View的位置和尺寸。 - 参数:
changed:此视图的尺寸或位置是否发生变化。left:相对于父视图的左边位置。top:相对于父视图的顶部位置。right:相对于父视图的右边位置。bottom:相对于父视图的底部位置。
2. 使用在测量过程中存储的子 View 尺寸来完成布局
- 在
onLayout方法中调用子视图的layout方法,使用getMeasuredWidth和getMeasuredHeight获取子视图的宽度和高度。
3. getMeasuredHeight 和 getHeight 的区别
getMeasuredWidth/getMeasuredHeight:- 作用:获取
View测量的宽高。 - 赋值时机:
measure过程中。 - 赋值方法:
setMeasuredDimension。 - 值大小:一般情况下二者获取的宽高值相等。
- 作用:获取
getWidth/getHeight:gtcg- 作用:获取
View最终的宽高。 - 赋值时机:
layout过程中。 - 赋值方法:
layout中传递的 4 个参数之间的运算。
- 作用:获取
4. 如何定义标签间距?
-
自定义属性:
-
在
res/values/新建attrs.xml文件,定义标签间距的属性。 -
示例代码:
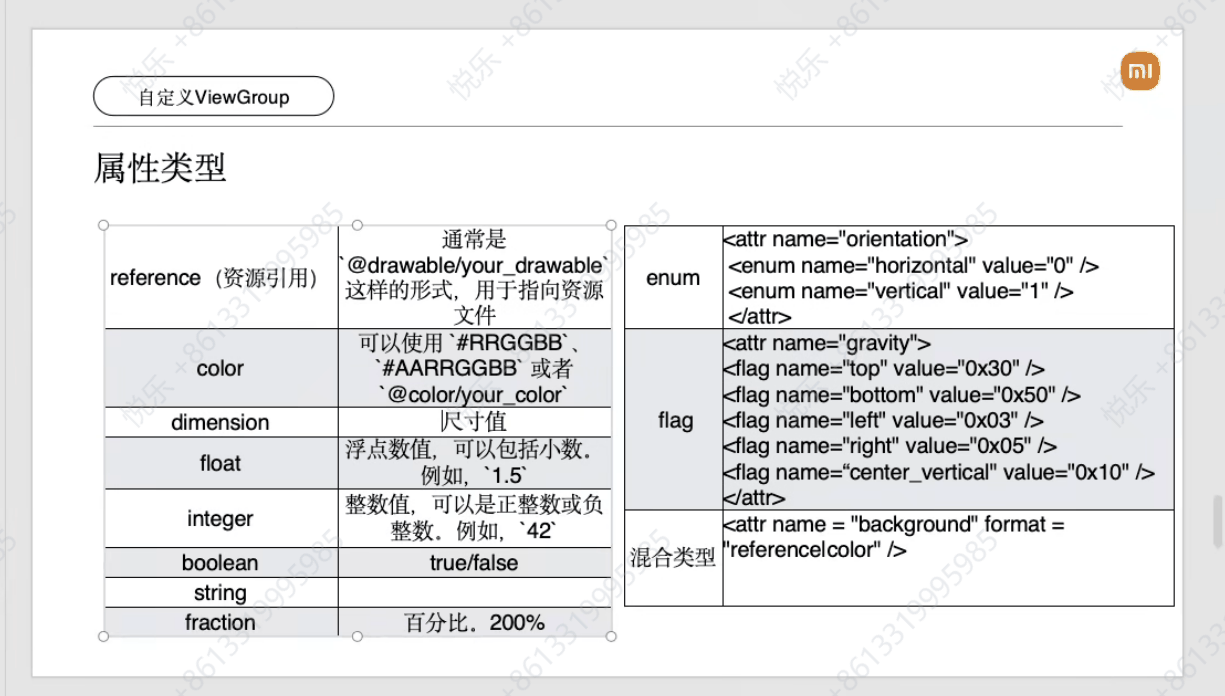
<?xml version="1.0" encoding="utf-8"?>
<resources>
    <declare-styleable name="TagCloud">
        <attr name="hMargin" format="dimension"/>
        <attr name="vMargin" format="dimension"/>
    </declare-styleable>
</resources>
-
1. 自定义属性与标签间距
定义自定义属性 gravity:
<attr name="gravity">
    <flag name="top" value="0x30" />
    <flag name="bottom" value="0x50" />
    <flag name="left" value="0x03" />
    <flag name="right" value="0x05" />
    <flag name="center_vertical" value="0x10" />
</attr>
定义混合类型属性 background:
<attr name="background" format="reference|color" />
2. 在 XML 中使用属性
示例代码:
<?xml version="1.0" encoding="utf-8"?>
<LinearLayout xmlns:android="http://schemas.android.com/apk/res/android"
    android:id="@+id/parent"
    android:layout_width="match_parent"
    android:layout_height="match_parent">

    <com.xiaomi.customview.TagCloud
        xmlns:app="http://schemas.android.com/apk/res-auto"
        android:id="@+id/cloud"
        android:layout_width="match_parent"
        android:layout_height="match_parent"
        app:hMargin="40dp"
        app:vMargin="20dp" />
</LinearLayout>
在 Java 代码中获取属性:
public TagCloud(@NonNull Context context, @Nullable AttributeSet attrs) {
    super(context, attrs);
    TypedArray a = context.obtainStyledAttributes(attrs, R.styleable.TagCloud);
    horizontalMargin = a.getDimension(R.styleable.TagCloud_hMargin, 20);
    verticalMargin = a.getDimension(R.styleable.TagCloud_vMargin, 10);
    a.recycle();
}
3. 响应手势操作
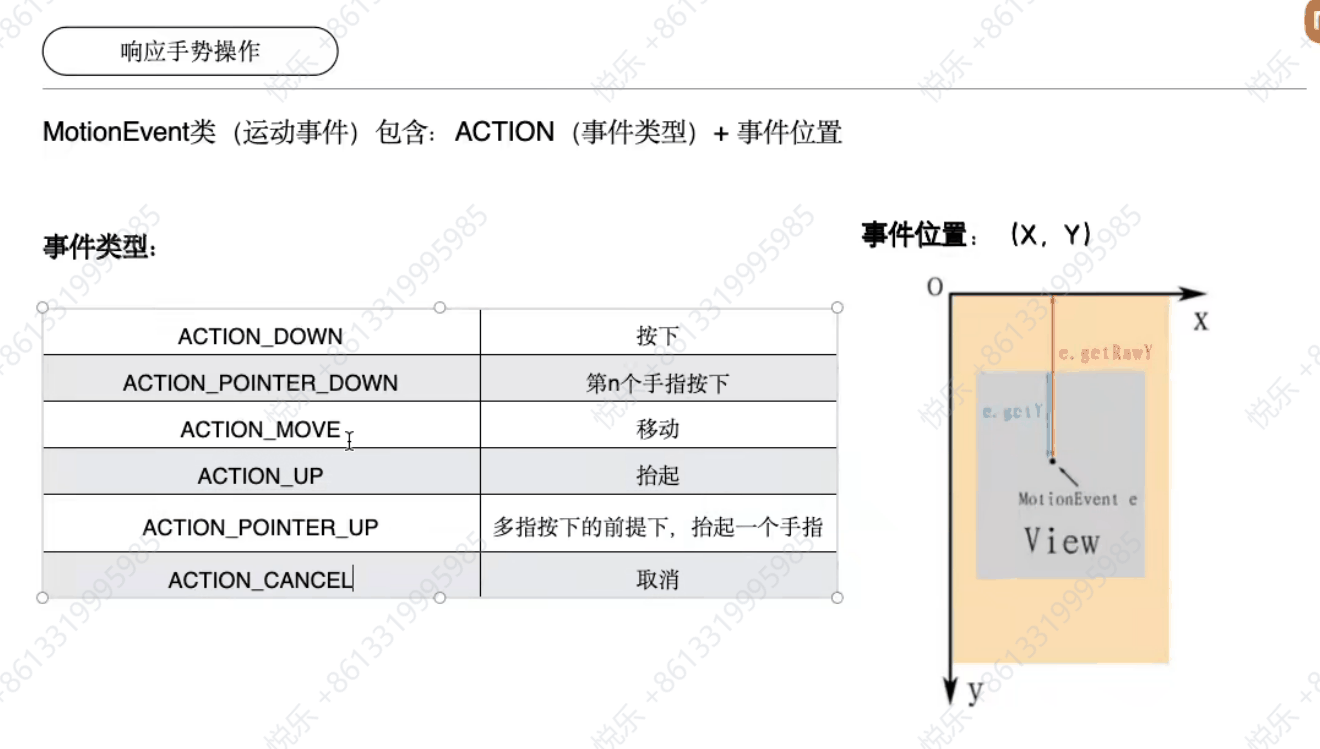
MotionEvent 类(运动事件)包含:ACTION(事件类型)+ 事件位置
onInterceptTouchEvent:
**用途:**当先分发给子View处理,且子View的dispatchTouchEvent返回true(子View表示会消费这个事件),当前ViewGroup依然有捕获的能力
场景:支持滑动的ViewGroup中的子View做了事件消费,第一个事件action_down发生在该子View范围内,该子View的dispatchTouchEvent方法返回true
第二个事件是action_move,此时当前ViewGroup判断为滑动手势,由自己开始消费(onInterceptTouchEvent返回true控制这事件),并且给子View分发action_cancel事件(帮助子View结束此组手势)
事件类型:
ACTION_DOWN:按下ACTION_POINTER_DOWN:第 n 个手指按下ACTION_MOVE:移动ACTION_UP:抬起ACTION_POINTER_UP:多指按下的前提下,抬起一个手指ACTION_CANCEL:取消
事件位置:
(x, y)坐标
示例代码:
@Override
public boolean onTouchEvent(MotionEvent event) {
    switch (event.getAction()) {
        case MotionEvent.ACTION_DOWN:
            // 处理按下事件
            break;
        case MotionEvent.ACTION_MOVE:
            // 处理移动事件
            break;
        case MotionEvent.ACTION_UP:
            // 处理抬起事件
            break;
        case MotionEvent.ACTION_CANCEL:
            // 处理取消事件
            break;
    }
    return true;
}
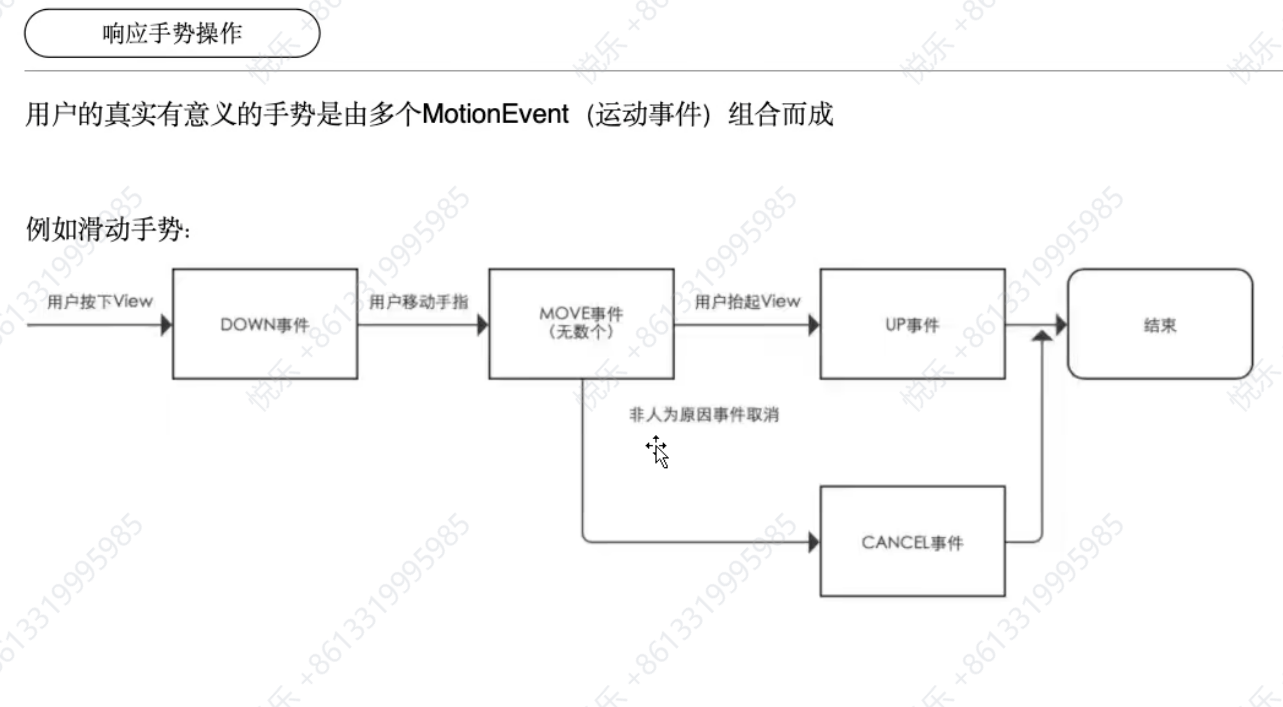
用户的真实有意义的手势是由多个 MotionEvent(运动事件)组合而成
例如:
- 用户滑动手势:
- DOWN事件
- MOVE事件(若干个)
- UP事件
- 进入另一个视图时的CANCEL事件
示例流程图:
    requirementDiagram

    requirement test_req {
    id: 1
    text: the test text.
    risk: high
    verifymethod: test
    }

    element test_entity {
    type: simulation
    }

    test_entity - satisfies -> test_req
GestureDetector 类及其回调方法
- onDown(MotionEvent e):
- 用户按下屏幕时调用,表示屏幕已经被触摸。
- 返回
false。
- onShowPress(MotionEvent e):
- 用户按下屏幕一段时间后,但未完成其他手势时调用。
- 无返回值。
- onSingleTapUp(MotionEvent e):
- 用户轻触屏幕时调用,且未发生滑动或长按。
- 返回
false。
- onScroll(MotionEvent e1, MotionEvent e2, float distanceX, float distanceY):
- 用户在屏幕上滑动时调用,提供起始事件和当前事件之间的滑动距离。
- 返回
false。
- onLongPress(MotionEvent e):
- 用户长按屏幕时调用,用于处理长按事件。
- 无返回值。
- onFling(MotionEvent e1, MotionEvent e2, float velocityX, float velocityY):
- 用户快速滑动后松开时调用,提供起始事件、当前事件以及滑动速度。
- 返回
false。
MotionEvent 事件类型
- ACTION_UP: 抬起
- ACTION_POINTER_UP: 多指按下的前提下,抬起一个手指
- ACTION_CANCEL: 取消
事件位置
- 事件位置为
(x, y)坐标系。
手势的组合
用户的真实手势是由多个 MotionEvent(运动事件)组合而成。例如:
- DOWN事件 -> MOVE事件 -> UP事件 -> CANCEL事件
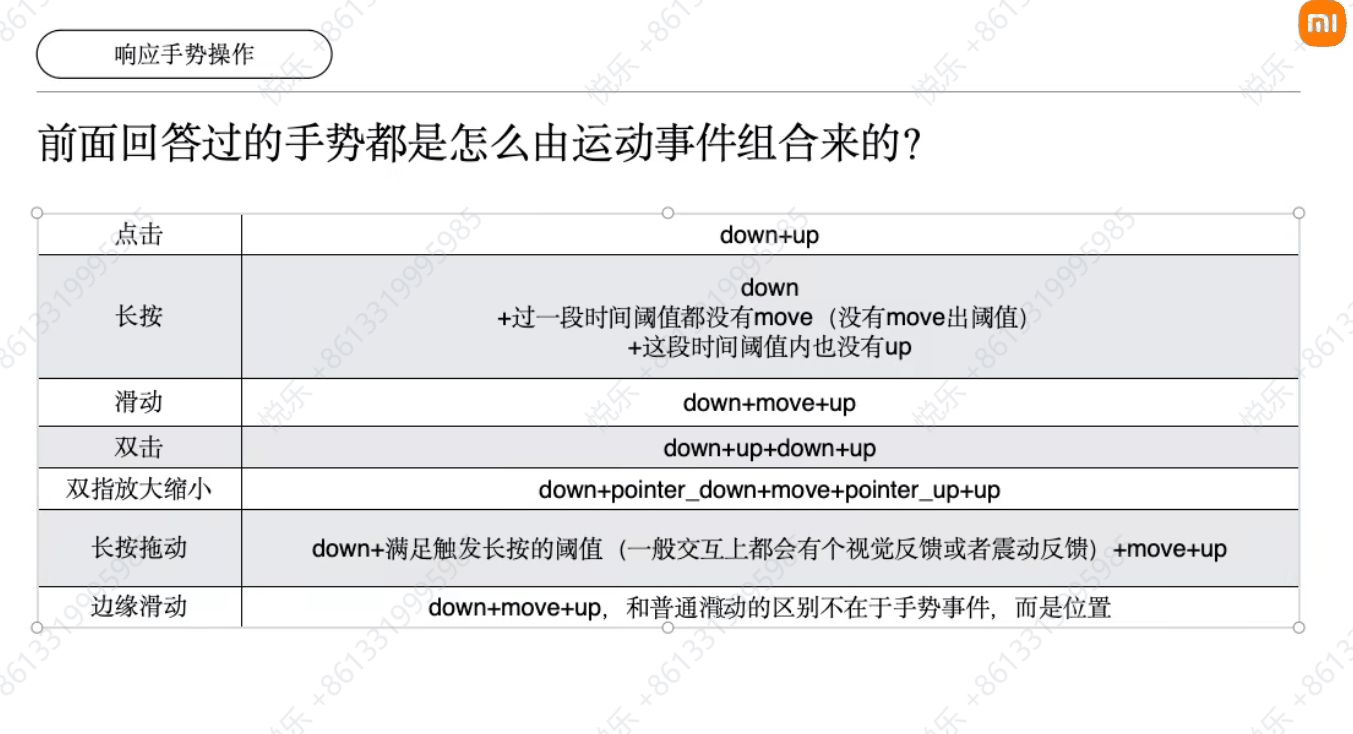
常见手势的事件组合
- 点击:
down + up - 长按:
down(持续一段时间没有move和up事件) - 滑动:
down + move + up - 双击:
down + up + down + up - 双指放大/缩小:
down + pointer_down + move + pointer_up + up - 长按拖动:
down + move + up(满足触发长按的阈值) - 边缘滑动:
down + move + up(区别在于事件位置在边缘)
GestureDetector 类
- 作用: 提供封装好的手势判断结果。
使用 onTouchEvent 方法或 onTouchListener 处理手势
通过重写 onTouchEvent 方法或注册 onTouchListener,可以将 MotionEvent 交给 GestureDetector 进行处理。
- 重写 onTouchEvent 方法:
@Override
public boolean onTouchEvent(MotionEvent event) {
    return mDetector.onTouchEvent(event);
}
- 注册 onTouchListener:
findViewById(R.id.parent).setOnTouchListener(new View.OnTouchListener() {
    @Override
    public boolean onTouch(View v, MotionEvent event) {
        return mDetector.onTouchEvent(event);
    }
});
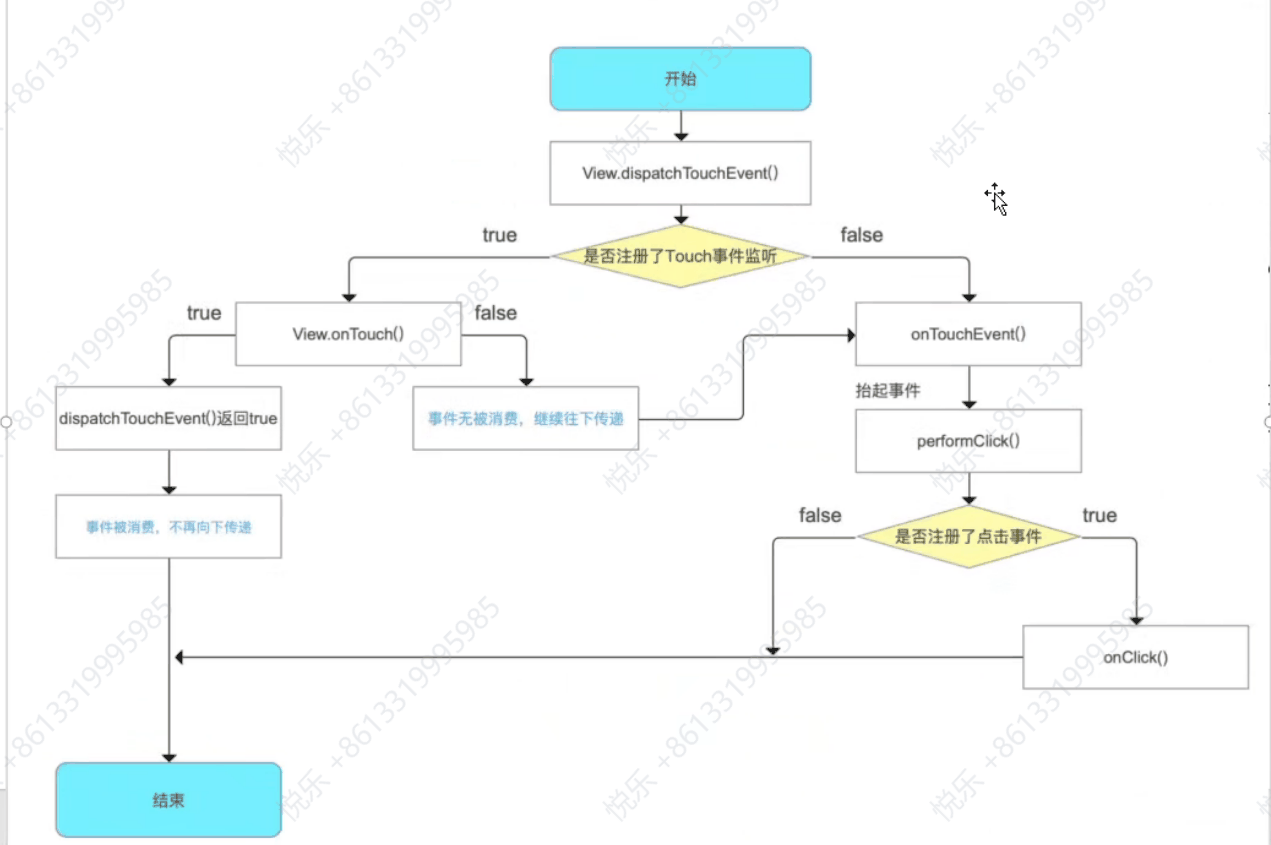
手势分发及响应过程:View 处理流程
- 流程图:
开始
 └── View.dispatchTouchEvent()(分发事件)
      ├── 是否注册了Touch事件监听
      │    ├── true:View.onTouch()
      │    │    ├── true:事件消费,不再向下分发
      │    │    └── false:事件无法消费,继续向下分发
      │    └── false:onTouchEvent()
      │         ├── 是否注册了点击事件
      │         │    ├── true:performClick() -> onClick()
      │         │    └── false:事件结束
      └── 结果
- 事件处理:
- 如果我们认为一个有意义的手势是由
ACTION_DOWN开始的一组MotionEvent事件组成,所以如果需要响应手势,第一个ACTION_DOWN就应该开始消费,即onTouch返回true(且整个手势都应该持续返回true)。如果返回false,那么后续父 View 将不会把该组事件分发到当前 View。
- 如果我们认为一个有意义的手势是由
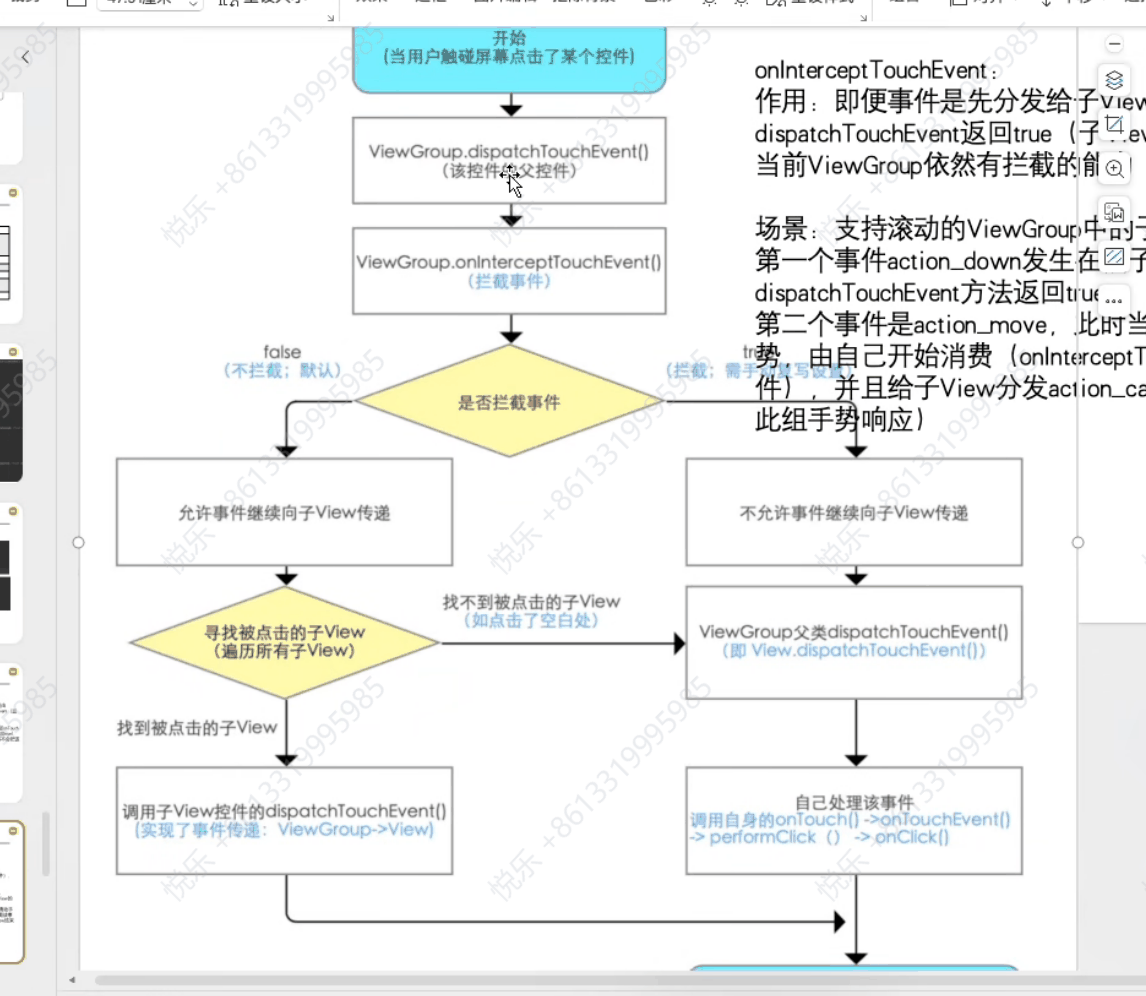
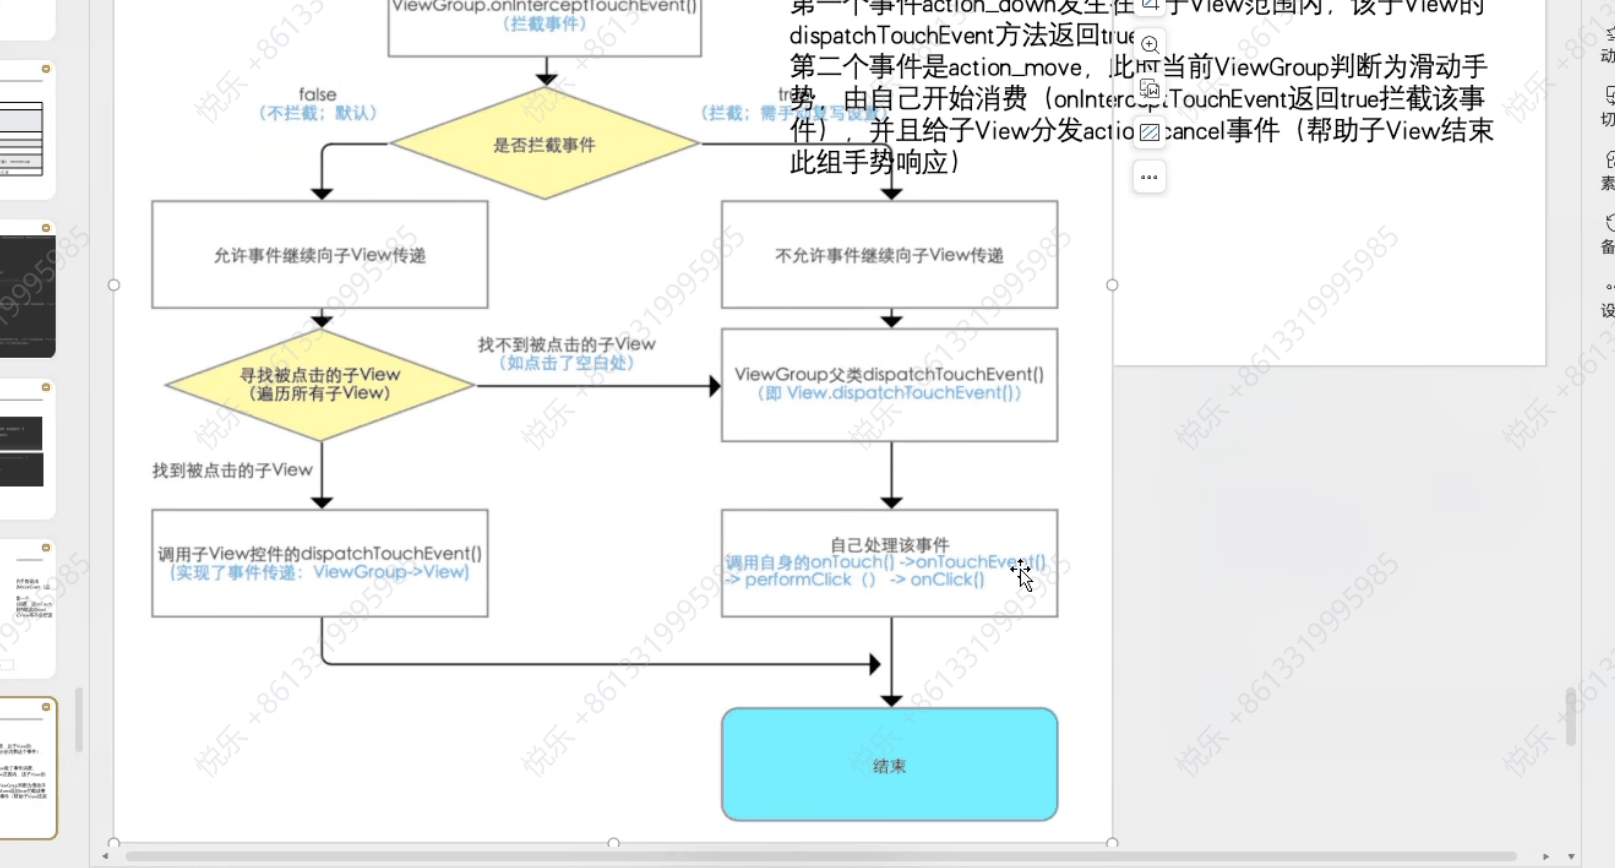
手势分发及响应过程:ViewGroup 处理流程
- 流程图:
开始
 └── ViewGroup.dispatchTouchEvent()(接收传递的事件)
      ├── ViewGroup.onInterceptTouchEvent()(拦截事件)
      │    ├── true:不允许事件继续向子View传递
      │    │    └── ViewGroup交给dispatchTouchEvent()(即View.dispatchTouchEvent())
      │    │         ├── 自己处理该事件 -> onTouchEvent() -> performClick() -> onClick()
      │    └── false:允许事件继续向子View传递
      │         ├── 找到被点击的子View(遍历所有子View)
      │         │    ├── 找到被点击的子View
      │         │    │    └── 调用子View的dispatchTouchEvent()(实现了事件传递:ViewGroup -> View)
      │         │    └── 找不到被点击的子View(如点击了空白处)
      └── 结果
- 事件处理:
ViewGroup通过dispatchTouchEvent()分发事件,事件分发到子 View 时,会调用onInterceptTouchEvent()判断是否拦截事件。- 如果拦截事件,
ViewGroup自己处理事件;如果不拦截,继续向子 View 传递,找到被点击的子 View 并调用其dispatchTouchEvent()进行事件传递和处理。
onInterceptTouchEvent
- 作用: 即使事件是无分发给子 View 处理,且子 View 的
dispatchTouchEvent返回true(子 View 表示会消费这个事件),当前ViewGroup依然有拦截的能力。 - 场景: 支持该功能的
ViewGroup中的子View做了事件消费,第一个事件action_down发生在该子View范围内,该子View的dispatchTouchEvent方法返回true。第二个事件是action_move,此时当前ViewGroup判断为滑动手势,由自己开始消费(onInterceptTouchEvent返回true拦截该事件),并且给子View分发action_cancel事件(帮助子View结束此组手势响应)。
扩展内容
-
GestureDetector#OnDoubleTapListener
- 作用: 检测双击手势。
- 使用: 使用方式同
GestureDetector。
-
ScaleGestureDetector 类
- 作用: 检测双指缩放手势。
- 使用: 使用方式同
GestureDetector。
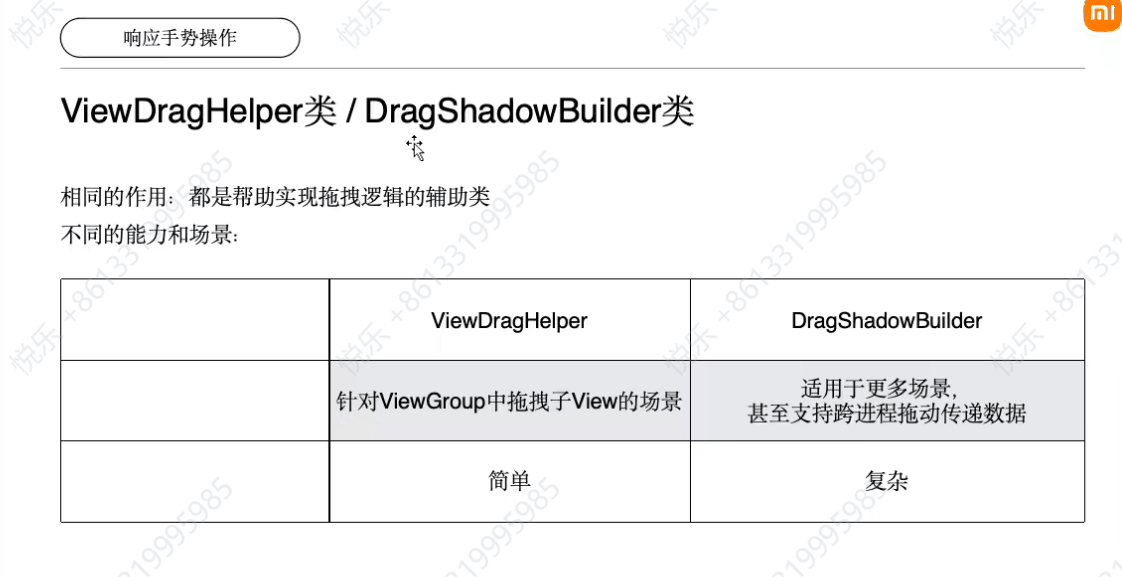
-
ViewDragHelper / DragShadowBuilder 类
-
相同的作用: 都是帮助实现拖拽逻辑的辅助类。
-
不同的能力和场景:
ViewDragHelper DragShadowBuilder 场景 针对 ViewGroup中拖拽子View的场景适用于更多场景,甚至支持跨进程拖动传递数据 使用难易 简单 复杂
-
课后阅读


