Android(1)
【金山文档 | WPS云文档】 Kotlin 讲义
https://kdocs.cn/l/cu14rrCtfKxv

【金山文档 | WPS云文档】 Android 四大组件课程概要
https://kdocs.cn/l/croaFl0RS5LA

【金山文档 | WPS云文档】 Fragment 重点知识
https://kdocs.cn/l/cj89XRLXypb8

【金山文档 | WPS云文档】 Android UI 课程重点知识
https://kdocs.cn/l/cokrSwEg1GF4

【金山文档 | WPS云文档】 Android布局与优化
https://kdocs.cn/l/ciwSdaSLRAwB

【金山文档 | WPS云文档】 组件库
https://kdocs.cn/l/cvsBNce6AfjI

【金山文档 | WPS云文档】 Android 动画
https://kdocs.cn/l/cf4bQiAeZdlI

【金山文档 | WPS云文档】 自定义控件的实现
https://kdocs.cn/l/cu3bUFFJVvn8

【金山文档 | WPS云文档】 权限与网络请求课程预习
https://kdocs.cn/l/cme7bRkDMYcB

【金山文档 | WPS云文档】 内存泄漏和ANR预习
https://kdocs.cn/l/cpFLi1gGV4Xs

Android 开发环境配置:https://www.kdocs.cn/l/cekCbJzGOsTM
Git 环境配置:https://kdocs.cn/l/crWdNGh7Onio
ctrl + alt + o 自动组织导入
App开发语言
- App开发主要有两大技术路径,分别是原生开发和混合开发
- Android的官方编程语言包括
Java和Kotlin
XML:Extensible Markup Language, 即可扩展标记语言
gradle下载镜像
使用官网下载非常的慢,建议使用镜像站:
(1)官网地址:https://services.gradle.org/distributions/ (2)腾讯镜像 Gradle下载地址:https://mirrors.cloud.tencent.com/gradle/ (3)阿里云镜像 Gradle下载地址:https://mirrors.aliyun.com/macports/distfiles/gradle/
虚拟机改成冷启动
https://blog.csdn.net/gh8609123/article/details/118514352
添加Maven阿里云源:
pluginManagement {
    repositoriesMode.set(RepositoriesMode.FAIL_ON_PROJECT_REPOS)
    repositories {
+       maven { url 'http://maven.aliyun.com/nexus/content/groups/public/'}
        google()
        mavenCentral()
    }
}
pluginManagement {
    repositories {
        maven {
+            url = uri("https://maven.aliyun.com/nexus/content/groups/public/")
        }
        google()
        mavenCentral()
        gradlePluginPortal()
    }
}

include(":app")
类似网页,XML描述界面,Java做交互效果
简单控件
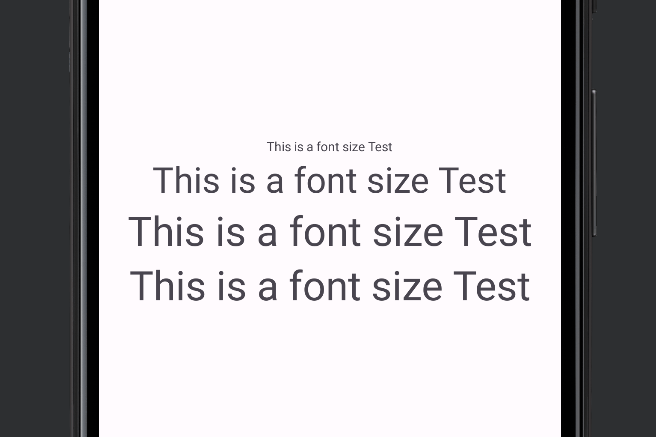
字体大小设置
- Java代码
tv.setTextSize(10);
- 在XML文件中则通过属性
android:textSize指定文本大小,此时需要指定字号单位。px:是手机屏幕的最小显示单位,与设备的显示屏有关dp:是与设备无关的显示单位**,只与屏幕的尺寸有关**sp:专门用来设置字体大小,在系统设置中可以调整字体大小
Dpi(像素密度dots-per-inch)计算规则
以$4.95$英寸 $1920*1080$ 的手机设备为例:
- 计算直角边像素数量:$1920^2 + 1080^2 = 2202^2$
- 计算
Dpi:$2205/4.95=445$ - 得到
Dpi为$445$ (每英寸的距离有$445$个像素)
Density
指屏幕上每平方英寸中含有的像素点数, $445^2$
Dip/dp (设备独立像素Device Independent Pixel)
所有显示到屏幕上的图像都是以px为单位的,Dip是开发中使用的长度单位,最后也需要转换成px,计算这个设备上1dip等于多少px
$px = dip * dpi / 160$
根据换算关系:
320*480像素,3.6寸的手机:dpi 为160,$ 1dp = 1px$
public class TextSizeActivity extends AppCompatActivity {
    @Override
    protected void onCreate(Bundle savedInstanceState) {
        super.onCreate(savedInstanceState);
        EdgeToEdge.enable(this);
        setContentView(R.layout.activity_text_size);
        TextView viewById = findViewById(R.id.hello_tv);
        viewById.setTextSize(30);
    }
}
<?xml version="1.0" encoding="utf-8"?>
<LinearLayout xmlns:android="http://schemas.android.com/apk/res/android"
    android:layout_width="match_parent"
    android:layout_height="match_parent"
    android:orientation="vertical"
    android:gravity="center"
    >
    <TextView
        android:id="@+id/tv_TextSize_px"
        android:layout_width="wrap_content"
        android:layout_height="wrap_content"
        android:text="@string/textSize"
        android:textSize="30px"
        />

    <TextView
        android:id="@+id/tv_TextSize_dp"
        android:layout_width="wrap_content"
        android:layout_height="wrap_content"
        android:text="@string/textSize"
        android:textSize="30dp"
        />

    <TextView
        android:id="@+id/tv_TextSize_sp"
        android:layout_width="wrap_content"
        android:layout_height="wrap_content"
        android:text="@string/textSize"
        android:textSize="30sp"
        />
<!--    sp跟随系统字体变大而变大-->

    <TextView
        android:id="@+id/hello_tv"
        android:layout_width="wrap_content"
        android:layout_height="wrap_content"
        android:text="@string/textSize"
        android:textSize="30px"
        />
</LinearLayout>
字体颜色设置
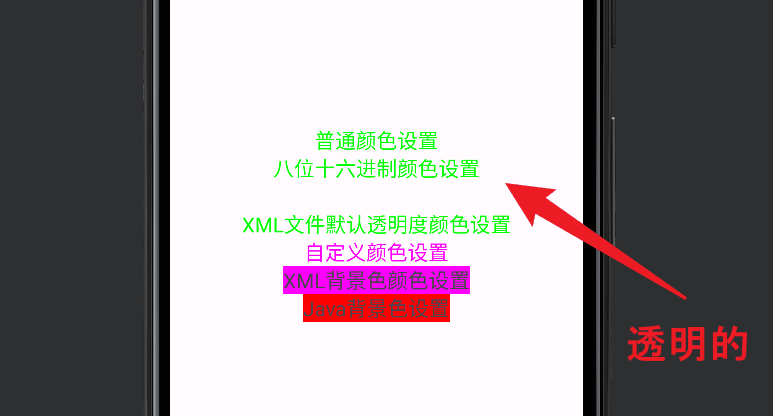
- 在XML文件中通过属性
android:textColor指定文本颜色,色值由透明度alpha和RGB三原色(红色red,绿色green,蓝色blue)联合定义。 - 色值有八位十六进制和六位十六进制两种表达方式,例如八位编码FFEEDDCC中,FF表示透明度,EE表示红色的浓度,DD表示绿色的浓度,CC表示蓝色的浓度。
- 透明度为FF表示完全不透明,为00表示完全透明。RGB三色的数值越大,表示颜色越浓,也就越亮;数值越小,表示颜色越淡,也就越暗。
Java中透明度设置的是透明(例如:0x00ff00 实际为:0x0000ff00),而XML文件中透明度设置默认为不透明(例如黑色:#000000, 实际为#ff000000)
<?xml version="1.0" encoding="utf-8"?>
<LinearLayout xmlns:android="http://schemas.android.com/apk/res/android"
    android:layout_width="match_parent"
    android:layout_height="match_parent"
    android:gravity="center"
    android:orientation="vertical">

    <TextView
        android:id="@+id/tv_TextSize_code_system"
        android:layout_width="wrap_content"
        android:layout_height="wrap_content"
        android:text="普通颜色设置"
        android:textSize="17sp" />

    <TextView
        android:id="@+id/tv_code_eight"
        android:layout_width="wrap_content"
        android:layout_height="wrap_content"
        android:text="八位十六进制颜色设置"
        android:textSize="17sp" />

    <TextView
        android:id="@+id/tv_code_six"
        android:layout_width="wrap_content"
        android:layout_height="wrap_content"
        android:text="六位十六进制颜色设置"
        android:textSize="17sp" />

    <TextView
        android:id="@+id/tv_xml"
        android:layout_width="wrap_content"
        android:layout_height="wrap_content"
        android:text="XML文件默认透明度颜色设置"
        android:textColor="#00ff00"
        android:textSize="17sp" />

    <TextView
        android:id="@+id/tv_values"
        android:layout_width="wrap_content"
        android:layout_height="wrap_content"
        android:text="自定义颜色设置"
        android:textColor="@color/kennemColor"
        android:textSize="17sp" />

    <TextView
        android:id="@+id/tv_bgc"
        android:layout_width="wrap_content"
        android:layout_height="wrap_content"
        android:background="@color/kennemColor"
        android:text="XML背景色颜色设置"
        android:textSize="17sp" />

    <TextView
        android:id="@+id/tv_java_bgc"
        android:layout_width="wrap_content"
        android:layout_height="wrap_content"
        android:text="Java背景色设置"
        android:textSize="17sp" />

</LinearLayout>
public class TextColorActivity extends AppCompatActivity {

    @Override
    protected void onCreate(Bundle savedInstanceState) {
        super.onCreate(savedInstanceState);
        // 设置当前活动的布局视图,布局文件为 activity_text_color.xml
        setContentView(R.layout.activity_text_color);

        // 获取布局文件中的 TextView,其 ID 为 tv_TextSize_code_system
        TextView textView = findViewById(R.id.tv_TextSize_code_system);
        // 将该 TextView 的文本颜色设置为绿色,使用 Color 类的静态常量
        textView.setTextColor(Color.GREEN);

        // 获取布局文件中的 TextView,其 ID 为 tv_code_eight
        TextView tv_code_eight = findViewById(R.id.tv_code_eight);
        // 将该 TextView 的文本颜色设置为绿色,使用 ARGB 格式的 8 位十六进制颜色值
        tv_code_eight.setTextColor(0xff00ff00);

        // 获取布局文件中的 TextView,其 ID 为 tv_code_six
        TextView tv_code_six = findViewById(R.id.tv_code_six);
        // 将该 TextView 的文本颜色设置为绿色,使用 RGB 格式的 6 位十六进制颜色值(0x00ff00)
        // 注意:这行代码存在问题,因为 0x00ff00 实际上是一个 24 位的值,会被解析为透明颜色。
        // 应该使用 0xff00ff00 这种 32 位格式。
        tv_code_six.setTextColor(0xff00ff00);  // 修改了原有的错误

        // 获取布局文件中的 TextView,其 ID 为 tv_java_bgc
        TextView tv_java_bgc = findViewById(R.id.tv_java_bgc);
        // 将该 TextView 的背景颜色设置为红色,使用 Color 类的静态常量
        tv_java_bgc.setBackgroundColor(Color.RED);
    }
}
设置视图的宽高
视图宽度通过属性android:layout_width表达,试图高度通过属性android:lay_height表达,宽高的取值主要有下列三种
match_parent:表示与上级试图保持一致wrap_content:表示与内容自适应- 以
dp为单位的具体尺寸

<?xml version="1.0" encoding="utf-8"?>
<LinearLayout xmlns:android="http://schemas.android.com/apk/res/android"
    android:layout_width="match_parent"
    android:layout_height="match_parent"
    android:gravity="center"
    android:orientation="vertical">

    <TextView
        android:layout_width="wrap_content"
        android:layout_height="wrap_content"
        android:layout_marginTop="5dp"
        android:background="#00ffff"
        android:text="视图宽高均用wrap_content定义"
        android:textColor="#000000"
        android:textSize="17sp" />

    <TextView
        android:layout_width="match_parent"
        android:layout_height="wrap_content"
        android:layout_marginTop="5dp"
        android:background="#00ffff"
        android:text="视图宽高均用match_parent定义"
        android:textColor="#000000"
        android:textSize="17sp" />

    <TextView
        android:layout_width="300dp"
        android:layout_height="wrap_content"
        android:layout_marginTop="5dp"
        android:background="#00ffff"
        android:text="视图宽度指定固定大小"
        android:textColor="#000000"
        android:textSize="17sp" />

    <TextView
        android:id="@+id/tv_code"
        android:layout_width="wrap_content"
        android:layout_height="wrap_content"
        android:layout_marginTop="5dp"
        android:background="#00ffff"
        android:text="用代码定义视图宽高"
        android:textColor="#000000"
        android:textSize="17sp" />

</LinearLayout>
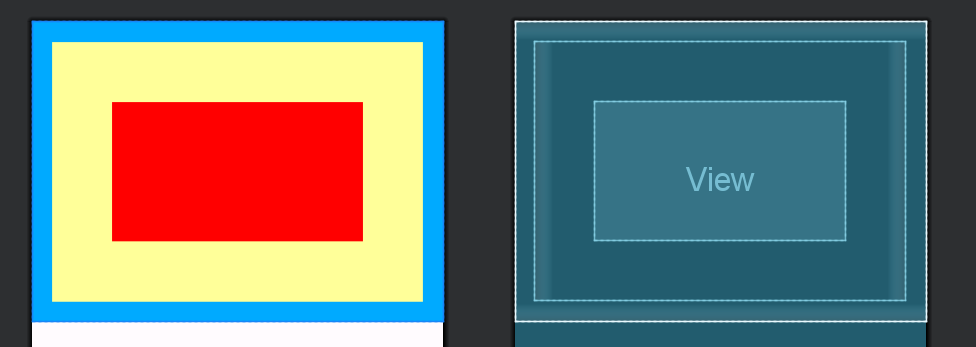
设置视图的间距
-
layout_margin: 当前视图与周围平级视图之间的距离。包括layout_margin,layout_marginLeft,layout_marginTop,layout_marginRight,layout_marginBottom. -
layout_padding: 当前视图和内部下级视图之间的关系, 包括padding,paddingLeft,paddingTop,paddingRight,paddingBottom
<?xml version="1.0" encoding="utf-8"?>
<LinearLayout xmlns:android="http://schemas.android.com/apk/res/android"
    android:layout_width="match_parent"
    android:layout_height="300dp"
    android:background="#00AAFF"
    android:orientation="vertical">

    <LinearLayout
        android:layout_width="match_parent"
        android:layout_height="match_parent"
        android:layout_margin="20dp"
        android:background="#FFFF99"
        android:padding="60dp">

        <View
            android:layout_width="match_parent"
            android:layout_height="match_parent"
            android:background="#FF0000" />

    </LinearLayout>

</LinearLayout>
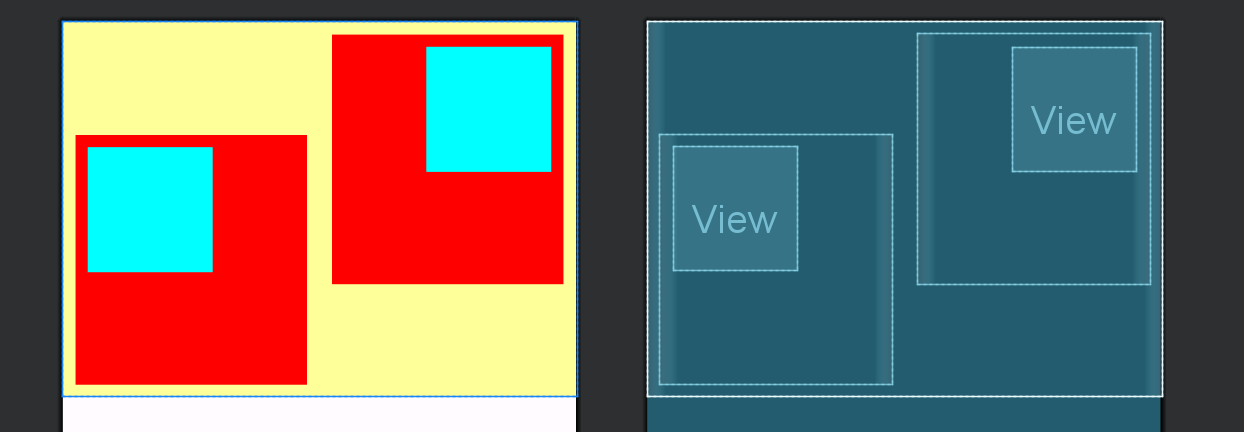
设置视图的对齐方式
-
设置视图的对齐方式有两种途径
- 采用
layout_gravity属性,它指定了当前视图相对于上级视图的对齐方式 - 采用
gravity属性,它指定了下级视图相对于当前视图的对齐方式
- 采用
-
layout_gravity与gravity的取值包括:left,top,right,bottom, 还可以用竖线连接各取值,例如"left|top"表示即靠左又靠上,左上角对齐。
<?xml version="1.0" encoding="utf-8"?>
<LinearLayout xmlns:android="http://schemas.android.com/apk/res/android"
    android:layout_width="match_parent"
    android:layout_height="300dp"
    android:background="#ffff99"
    android:orientation="horizontal" >

    <LinearLayout
        android:layout_width="0dp"
        android:layout_height="200dp"
        android:layout_weight="1"
        android:layout_margin="10dp"
        android:background="#ff0000"
        android:padding="10dp"
        android:layout_gravity="bottom"
        android:gravity="left">

        <View
            android:layout_width="100dp"
            android:layout_height="100dp"
            android:background="#00ffff"/>
    </LinearLayout>

    <LinearLayout
        android:layout_width="0dp"
        android:layout_height="200dp"
        android:layout_weight="1"
        android:layout_margin="10dp"
        android:background="#ff0000"
        android:padding="10dp"
        android:layout_gravity="top"
        android:gravity="right">
        <View
            android:layout_width="100dp"
            android:layout_height="100dp"
            android:background="#00ffff"
            />
    </LinearLayout>

</LinearLayout>
常用布局
线性布局LinearLayout
线性布局的权重
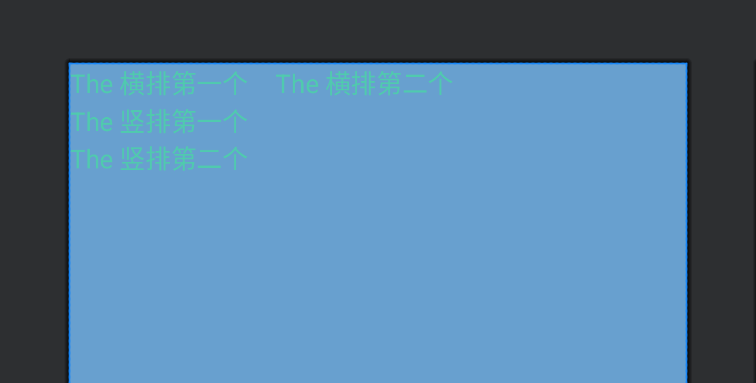
- 线性布局的权重概念,指的是线性布局的下级视图各自拥有多大比例的宽高
- 权重属性名叫
layout_weight, 但该属性不在LinearLayout节点设置,而在线性布局的直接下级视图设置,表示该下级视图占据的宽高比例。layout_width填0dp时,layout_weight表示水平方向的宽度比例。layout_height填0dp时,layout_weight表示垂直方向的高度比例。
<?xml version="1.0" encoding="utf-8"?>
<LinearLayout xmlns:android="http://schemas.android.com/apk/res/android"
    android:id="@+id/main"
    android:layout_width="match_parent"
    android:layout_height="match_parent"
    android:orientation="vertical"
    android:background="@color/backgroundColor">

    <LinearLayout
        android:layout_width="match_parent"
        android:layout_height="wrap_content"
        android:orientation="horizontal">

        <TextView
            android:layout_width="0dp"
            android:layout_height="wrap_content"
            android:layout_weight="1"
            android:text="The 横排第一个"
            android:textColor="@color/kennemColor"
            android:textSize="17sp" />

        <TextView
            android:layout_width="0dp"
            android:layout_height="wrap_content"
            android:layout_weight="2"
            android:text="The 横排第二个"
            android:textColor="@color/kennemColor"
            android:textSize="17sp" />

    </LinearLayout>

    <LinearLayout
        android:layout_width="match_parent"
        android:layout_height="wrap_content"
        android:orientation="vertical">

        <TextView
            android:layout_width="wrap_content"
            android:layout_height="0dp"
            android:layout_weight="1"
            android:text="The 竖排第一个"
            android:textColor="@color/kennemColor"
            android:textSize="17sp" />

        <TextView
            android:layout_width="wrap_content"
            android:layout_height="0dp"
            android:layout_weight="1"
            android:text="The 竖排第二个"
            android:textColor="@color/kennemColor"
            android:textSize="17sp" />

    </LinearLayout>

</LinearLayout>
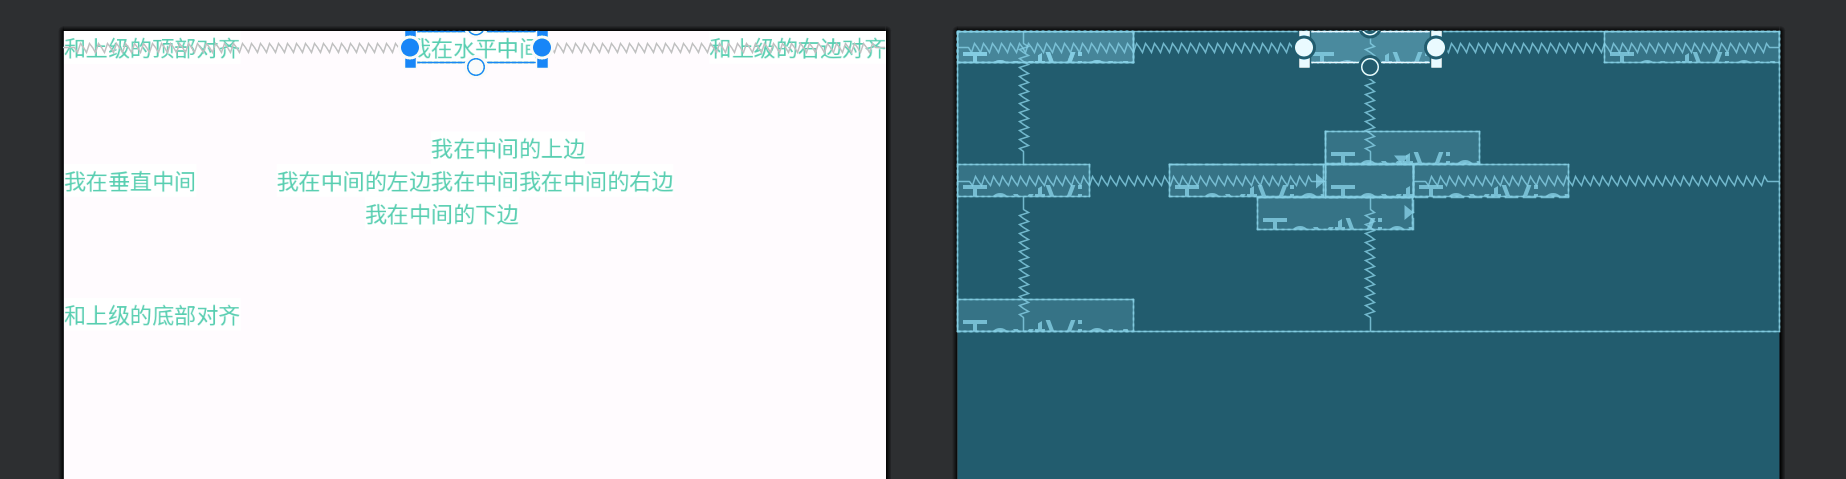
相对布局RelativeLayout
- 相对布局的下级视图位置又其他视图决定。用于确定下级视图位置的参照物分两种:
- 与该视图自身平级的视图
- 该视图的上级视图(也就是它归属的
RelativeLayout)
- 如果不设定下级视图的参照物,那么下级视图默认显示在
RelativeLayout内部的左上角。
<?xml version="1.0" encoding="utf-8"?>
<RelativeLayout xmlns:android="http://schemas.android.com/apk/res/android"
    android:layout_width="match_parent"
    android:layout_height="150dp"
    android:orientation="vertical">

    <TextView
        android:id="@+id/tv_center"
        android:layout_width="wrap_content"
        android:layout_height="wrap_content"
        android:layout_centerInParent="true"
        android:background="#ffffff"
        android:text="我在中间"
        android:textSize="11sp"
        android:textColor="@color/kennemColor"/>

    <TextView
        android:id="@+id/tv_center_horizontal"
        android:layout_width="wrap_content"
        android:layout_height="wrap_content"
        android:layout_centerHorizontal="true"
        android:background="#ffffff"
        android:text="我在水平中间"
        android:textSize="11sp"
        android:textColor="@color/kennemColor"/>

    <TextView
        android:id="@+id/tv_center_vertical"
        android:layout_width="wrap_content"
        android:layout_height="wrap_content"
        android:layout_centerVertical="true"
        android:background="#ffffff"
        android:text="我在垂直中间"
        android:textSize="11sp"
        android:textColor="@color/kennemColor"/>

    <TextView
        android:id="@+id/tv_parent_left"
        android:layout_width="wrap_content"
        android:layout_height="wrap_content"
        android:layout_alignParentLeft="true"
        android:background="#ffffff"
        android:text="和上级的左边对齐"
        android:textSize="11sp"
        android:textColor="@color/kennemColor"/>

    <TextView
        android:id="@+id/tv_parent_right"
        android:layout_width="wrap_content"
        android:layout_height="wrap_content"
        android:layout_alignParentRight="true"
        android:background="#ffffff"
        android:text="和上级的右边对齐"
        android:textSize="11sp"
        android:textColor="@color/kennemColor"/>

    <TextView
        android:id="@+id/tv_parent_top"
        android:layout_width="wrap_content"
        android:layout_height="wrap_content"
        android:layout_alignParentTop="true"
        android:background="#ffffff"
        android:text="和上级的顶部对齐"
        android:textSize="11sp"
        android:textColor="@color/kennemColor"/>

    <TextView
        android:id="@+id/tv_parent_bottom"
        android:layout_width="wrap_content"
        android:layout_height="wrap_content"
        android:layout_alignParentBottom="true"
        android:background="#ffffff"
        android:text="和上级的底部对齐"
        android:textSize="11sp"
        android:textColor="@color/kennemColor"/>

    <TextView
        android:id="@+id/tv_left_center"
        android:layout_width="wrap_content"
        android:layout_height="wrap_content"
        android:layout_toLeftOf="@id/tv_center"
        android:layout_alignTop="@+id/tv_center"
        android:background="#ffffff"
        android:text="我在中间的左边"
        android:textSize="11sp"
        android:textColor="@color/kennemColor"/>

    <TextView
        android:id="@+id/tv_right_center"
        android:layout_width="wrap_content"
        android:layout_height="wrap_content"
        android:layout_toRightOf="@id/tv_center"
        android:layout_alignBottom="@+id/tv_center"
        android:background="#ffffff"
        android:text="我在中间的右边"
        android:textSize="11sp"
        android:textColor="@color/kennemColor"/>

    <TextView
        android:id="@+id/tv_top_center"
        android:layout_width="wrap_content"
        android:layout_height="wrap_content"
        android:layout_above="@id/tv_center"
        android:layout_alignLeft="@+id/tv_center"
        android:background="#ffffff"
        android:text="我在中间的上边"
        android:textSize="11sp"
        android:textColor="@color/kennemColor"/>

    <TextView
        android:id="@+id/tv_blow_center"
        android:layout_width="wrap_content"
        android:layout_height="wrap_content"
        android:layout_below="@id/tv_center"
        android:layout_alignRight="@+id/tv_center"
        android:background="#ffffff"
        android:text="我在中间的下边"
        android:textSize="11sp"
        android:textColor="@color/kennemColor"/>

</RelativeLayout>
网格布局GridLayout
- 网格布局支持多行多列的表格排列。
- 网格布局默认从左往右、从上到下排列,它新增了两个属性:
columnCount属性,它指定了网格的列数,即每行能放多少个视图;rowCount属性,它指定了网格的行数,即每列能放多少个视图
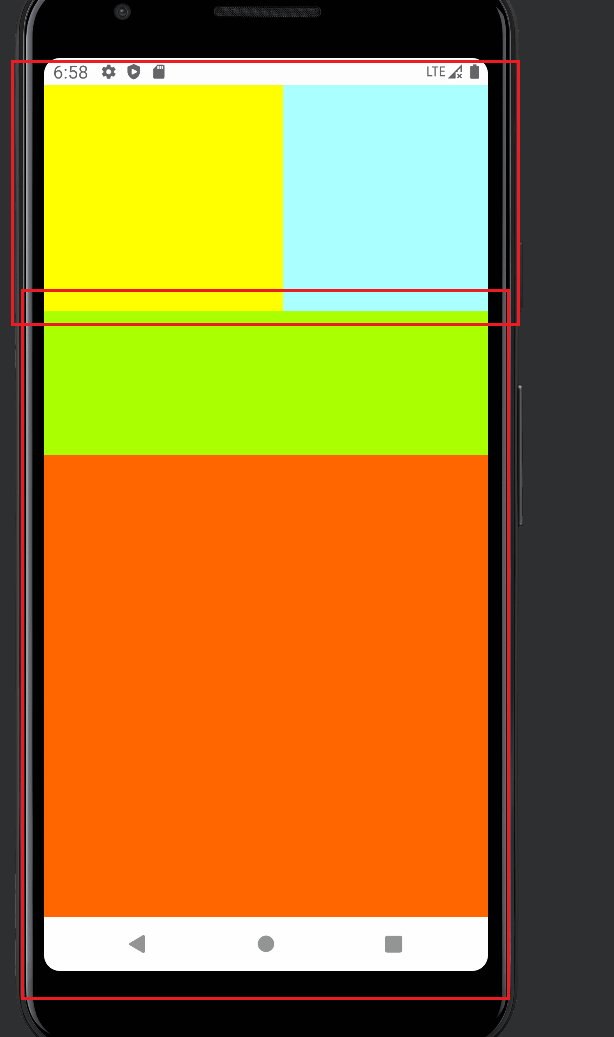
滚动视图ScrollView
滚动视图有两种:
-
ScrollView, 它是垂直方向的滚动视图,垂直方向滚动时,layout_width属性值设置为match_parent,layout_height属性值设置为wrap_content。 -
HorizontalScrollView, 它是水平方向的滚动视图;水平方向滚动时,layout_width属性值设置为wrap_content,layout_height属性值设置为match_parent。
哪个方向要滑动就将哪个方向设置为wrap_content
<?xml version="1.0" encoding="utf-8"?>
<LinearLayout xmlns:android="http://schemas.android.com/apk/res/android"
    android:id="@+id/main"
    android:layout_width="match_parent"
    android:layout_height="match_parent"
    android:orientation="vertical">

    <HorizontalScrollView
        android:layout_width="wrap_content"
        android:layout_height="200dp">

        <LinearLayout
            android:layout_width="wrap_content"
            android:layout_height="match_parent"
            android:orientation="horizontal">

            <View
                android:layout_width="300dp"
                android:layout_height="match_parent"
                android:background="#ffff00" />

            <View
                android:layout_width="300dp"
                android:layout_height="match_parent"
                android:background="#aaffff" />

        </LinearLayout>
    </HorizontalScrollView>

    <ScrollView
        android:layout_width="match_parent"
        android:layout_height="wrap_content">

        <LinearLayout
            android:layout_width="wrap_content"
            android:layout_height="match_parent"
            android:orientation="vertical">

            <View
                android:layout_width="match_parent"
                android:layout_height="700dp"
                android:background="#aaff00" />

            <View
                android:layout_width="match_parent"
                android:layout_height="700dp"
                android:background="#ff6600" />

        </LinearLayout>

    </ScrollView>

</LinearLayout>
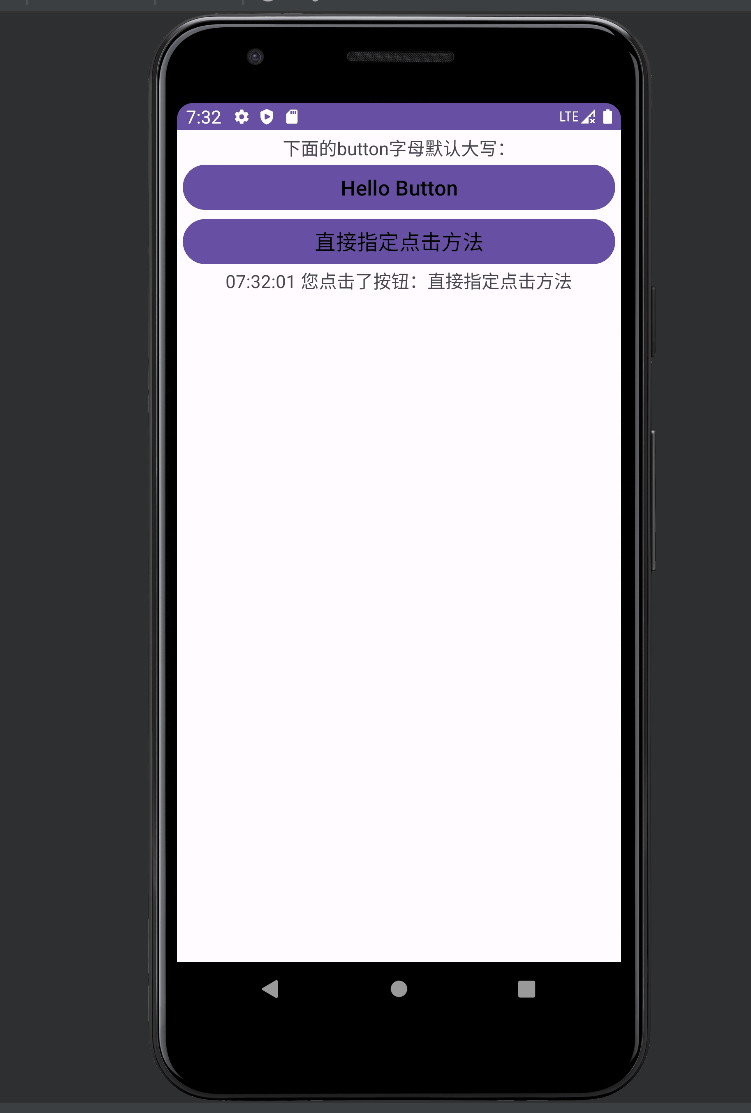
按钮控件Button
按钮控件Button由TextView派生而来,它们之间的区别有:
Button拥有默认的按钮背景,而TextView默认无背景Button的内部文本默认居中对齐,而TextView的内部文本默认靠左对齐Button会默认将英文字母转为大写,而TextView保持原始的英文大小写(新版保持原有格式)
按钮控件的新增属性
与TextView相比,Button增加了两个新属性:
textAllCaps属性,它指定了是否将英文字母转为大写,为true表示自动转为大写,为false表示不做大写转换onClick属性:它用来接管用户的点击动作,指定了点击按钮时要触发哪个方法
ButtonStyleActivity.java
将 findViewById(R.id.button_result) 存储到一个全局变量中,快捷键:ctrl + alt + f
public class ButtonStyleActivity extends AppCompatActivity {

    private TextView button_result;

    @Override
    protected void onCreate(Bundle savedInstanceState) {
        super.onCreate(savedInstanceState);
        setContentView(R.layout.activity_button_style);
        button_result = findViewById(R.id.button_result);

    }

    public void doClick(View view){
        String desc = String.format("%s 您点击了按钮:%s", DateUtil.getNowTime(), ((Button)view).getText());
        button_result.setText(desc);
    }
}
布局文件:
<?xml version="1.0" encoding="utf-8"?>
<LinearLayout xmlns:android="http://schemas.android.com/apk/res/android"
    android:id="@+id/main"
    android:layout_width="match_parent"
    android:layout_height="match_parent"
    android:orientation="vertical"
    android:padding="5dp">

    <TextView
        android:layout_width="wrap_content"
        android:layout_height="wrap_content"
        android:text="下面的button字母默认大写:"
        android:layout_gravity="center"
        />

    <Button
        android:layout_width="match_parent"
        android:layout_height="wrap_content"
        android:text="Hello Button"
        android:textColor="@color/black"
        android:textSize="16sp"
        />

    <Button
        android:layout_width="match_parent"
        android:layout_height="wrap_content"
        android:text="直接指定点击方法"
        android:textColor="@color/black"
        android:textSize="16sp"
        android:onClick="doClick"
        />

    <TextView
        android:id="@+id/button_result"
        android:layout_width="wrap_content"
        android:layout_height="wrap_content"
        android:text="下面时点击按钮查看到的结果 "
        android:layout_gravity="center"
        />

</LinearLayout>
点击事件和长按事件
- 监听器,意思是对专门监听控件的动作行为。只有控件发生了指定的动作,监听器才会触发开关去执行对应的代码逻辑
- 按钮控件有两种常用的监听器:
- 点击监听器:通过
setOnClickListener方法设置。按钮被按住少于500毫秒时,会触发点击事件 - 长按监听器,通过
setOnLongClickListener方法设置。按钮被按住超过500毫秒时,会触发长按事件。
- 点击监听器:通过
单击事件
XML布局文件
<?xml version="1.0" encoding="utf-8"?>
<LinearLayout xmlns:android="http://schemas.android.com/apk/res/android"
    android:id="@+id/main"
    android:layout_width="match_parent"
    android:layout_height="match_parent"
    android:orientation="vertical">

    <Button
        android:id="@+id/btn_click_sigle"
        android:layout_width="match_parent"
        android:layout_height="wrap_content"
        android:text="指定单独的单击按钮"
        android:textColor="@color/black"
        android:textSize="15sp"
        />

    <Button
        android:id="@+id/btn_click_public"
        android:layout_width="match_parent"
        android:layout_height="wrap_content"
        android:text="指定公共的单击按钮"
        android:textColor="@color/black"
        android:textSize="15sp"
        />

    <TextView
        android:id="@+id/tv_result"
        android:layout_width="match_parent"
        android:layout_height="wrap_content"
        android:padding="5dp"
        android:gravity="center"
        android:textColor="@color/black"
        android:textSize="15sp"
        android:text="点击按钮查看显示结果"/>

</LinearLayout>
Java文件
/**
 * ButtonClickActivity类,继承AppCompatActivity,实现View.OnClickListener接口
 * 用于处理按钮点击事件
 */
public class ButtonClickActivity extends AppCompatActivity implements View.OnClickListener {

    // 定义View和TextView类型的成员变量
    private View btn_click_sigle;
    private TextView tv_result;

    /**
     * 在Activity创建时调用,初始化Activity
     * @param savedInstanceState 用于保存Activity的状态
     */
    @Override
    protected void onCreate(Bundle savedInstanceState) {
        super.onCreate(savedInstanceState);
        setContentView(R.layout.activity_button_click); // 设置布局文件

        // 获取布局中的TextView控件
        tv_result = findViewById(R.id.tv_result);
        // 获取布局中的按钮控件
        btn_click_sigle = findViewById(R.id.btn_click_sigle);
        // 设置按钮的点击监听器
        btn_click_sigle.setOnClickListener(new MyOnClickListener(tv_result));

        // 获取另一个按钮控件
        Button btn_click_public = findViewById(R.id.btn_click_public);
        // 设置当前类为按钮的点击监听器
        btn_click_public.setOnClickListener(this);
    }

    /**
     * 重写View.OnClickListener接口中的onClick方法
     * 处理按钮的点击事件
     * @param v 被点击的View
     */
    @Override
    public void onClick(View v) {
        if (v.getId() == R.id.btn_click_public) { // 判断点击的是否为btn_click_public按钮
            // 获取当前时间和按钮文本,格式化字符串
            String desc = String.format("%s 您点击了按钮:%s", DateUtil.getNowTime(), ((Button) v).getText());
            // 设置TextView的文本内容
            tv_result.setText(desc);
        }
    }

    /**
     * 静态内部类,实现View.OnClickListener接口
     * 防止内存泄漏,处理按钮的点击事件
     */
    static class MyOnClickListener implements View.OnClickListener {
        // 定义TextView类型的成员变量
        private final TextView tv_result;

        /**
         * 构造函数,初始化TextView
         * @param tv_result TextView控件
         */
        public MyOnClickListener(TextView tv_result) {
            this.tv_result = tv_result;
        }

        /**
         * 重写View.OnClickListener接口中的onClick方法
         * 处理按钮的点击事件
         * @param v 被点击的View
         */
        @Override
        public void onClick(View v) {
            // 获取当前时间和按钮文本,格式化字符串
            String desc = String.format("%s 您点击了按钮:%s", DateUtil.getNowTime(), ((Button) v).getText());
            // 设置TextView的文本内容
            tv_result.setText(desc);
        }
    }
}
长按事件
XML
<?xml version="1.0" encoding="utf-8"?>
<LinearLayout xmlns:android="http://schemas.android.com/apk/res/android"
    android:id="@+id/main"
    android:layout_width="match_parent"
    android:layout_height="match_parent"
    android:orientation="vertical">

    <Button
        android:id="@+id/btn_long_click"
        android:layout_width="match_parent"
        android:layout_height="wrap_content"
        android:text="指定长按的点击监听器"
        android:textColor="@color/black"
        android:textSize="15sp"
        />


    <TextView
        android:id="@+id/tv_result"
        android:layout_width="match_parent"
        android:layout_height="wrap_content"
        android:padding="5dp"
        android:gravity="center"
        android:textColor="@color/black"
        android:textSize="15sp"
        android:text="点击按钮查看显示结果"/>

</LinearLayout>
Java
package com.showguan.myapplication;

import android.os.Bundle;
import android.view.View;
import android.widget.Button;
import android.widget.TextView;

import androidx.activity.EdgeToEdge;
import androidx.appcompat.app.AppCompatActivity;
import androidx.core.graphics.Insets;
import androidx.core.view.ViewCompat;
import androidx.core.view.WindowInsetsCompat;

import com.showguan.myapplication.util.DateUtil;

public class ButtomLongClickActivity extends AppCompatActivity {

    private TextView tv_result;

    @Override
    protected void onCreate(Bundle savedInstanceState) {
        super.onCreate(savedInstanceState);
        setContentView(R.layout.activity_buttom_long_click);
        tv_result = findViewById(R.id.tv_result);
        Button btn_long_click = findViewById(R.id.btn_long_click);
        btn_long_click.setOnLongClickListener(v -> {
            String desc = String.format("%s 您点击了按钮:%s", DateUtil.getNowTime(), ((Button) v).getText());
            tv_result.setText(desc);
            return true;
        });
    }
}
禁用和恢复
在实际业务中,按钮通常拥有两种状态,即不可用状态和可用状态,它们在外观和功能上的区别如下:
- 不可用按钮:按钮不允许点击,即使点击也没反应,同时按钮文字为灰色
- 可用按钮:按钮允许点击,点击按钮会触发点击事件,同时按钮文字为正常的黑色。
是否允许点击由enabled属性控制,属性值为true时表示允许点击,为false时表示不允许点击。
XML文件
<?xml version="1.0" encoding="utf-8"?>
<LinearLayout xmlns:android="http://schemas.android.com/apk/res/android"
    android:id="@+id/main"
    android:layout_width="match_parent"
    android:layout_height="match_parent"
    android:orientation="vertical">

    <LinearLayout
        android:layout_width="match_parent"
        android:layout_height="wrap_content">

        <Button
            android:id="@+id/btn_enable"
            android:layout_width="0dp"
            android:layout_weight="1"
            android:layout_height="wrap_content"
            android:text="启动测试按钮"
            android:textColor="@color/black"
            android:textSize="17sp"/>
        <Button
            android:id="@+id/btn_disenable"
            android:layout_width="0dp"
            android:layout_weight="1"
            android:layout_height="wrap_content"
            android:text="禁用测试按钮"
            android:textColor="@color/black"
            android:textSize="17sp"/>


    </LinearLayout>

    <Button
        android:id="@+id/btn_test"
        android:layout_width="match_parent"
        android:layout_height="wrap_content"
        android:text="测试按钮"
        android:textColor="@color/black"
        android:textSize="17sp"
        android:enabled="false"/>

    <TextView
        android:id="@+id/tv_content"
        android:layout_width="match_parent"
        android:layout_height="wrap_content"
        android:text="这里查看测试按钮的结果"
        android:textColor="@color/kennemColor"
        android:textSize="17sp"/>

</LinearLayout>
Java
/**
 * ButtonEnableActivity类,继承AppCompatActivity,实现View.OnClickListener接口
 * 用于处理按钮启用和禁用的功能
 */
public class ButtonEnableActivity extends AppCompatActivity implements View.OnClickListener {

    // 定义TextView和Button类型的成员变量
    private TextView tv_content;
    private Button btn_test;
    private Button btn_enable;
    private Button btn_disenable;

    /**
     * 在Activity创建时调用,初始化Activity
     * @param savedInstanceState 用于保存Activity的状态
     */
    @Override
    protected void onCreate(Bundle savedInstanceState) {
        super.onCreate(savedInstanceState);
        setContentView(R.layout.activity_button_enable); // 设置布局文件

        // 获取布局中的按钮控件
        btn_enable = findViewById(R.id.btn_enable);
        btn_disenable = findViewById(R.id.btn_disenable);
        btn_test = findViewById(R.id.btn_test);
        // 获取布局中的TextView控件
        tv_content = findViewById(R.id.tv_content);

        // 设置按钮的点击监听器
        btn_enable.setOnClickListener(this);
        btn_disenable.setOnClickListener(this);
        btn_test.setOnClickListener(this);
    }

    /**
     * 重写View.OnClickListener接口中的onClick方法
     * 处理按钮的点击事件
     * @param v 被点击的View
     */
    @Override
    public void onClick(View v) {
        int id = v.getId(); // 获取被点击View的ID
        if (id == R.id.btn_enable) { // 如果点击的是启用按钮
            btn_test.setEnabled(true); // 启用测试按钮
            btn_test.setTextColor(Color.BLACK); // 设置按钮文字颜色为黑色
        } else if (id == R.id.btn_disenable) { // 如果点击的是禁用按钮
            btn_test.setEnabled(false); // 禁用测试按钮
            btn_test.setTextColor(Color.GRAY); // 设置按钮文字颜色为灰色
        } else if (id == R.id.btn_test) { // 如果点击的是测试按钮
            tv_content.setText("测试按钮被点击了"); // 设置TextView的文本内容
        }
    }
}
图像显示ImageView
图像视图展示的图片通常位于res/drawable***目录下,设置图像视图的显示图片有两种方式
- 在XML文件中,通过属性
android:src属性值格式如"@drawable/不含扩展名的图片名称" - 在Java代码中,调用setImageResource方法设置图片资源,方法参数格式形如"R.drawable.不含扩展名的图片名称"。
centerInside和center, fitCenter的区别:
fitCenter既允许缩小图片,也允许放大图片,centerInside只允许缩小图片,不允许放大图片,而center自始至终保持原始尺寸,既不允许缩小图片,也不允许放大图片
默认为fitCenter
代码设置方式:
        ImageView iv_scale = findViewById(R.id.iv_scale);
        iv_scale.setImageResource(R.drawable.cat);
        iv_scale.setScaleType(ImageView.ScaleType.FIT_END);
图像按钮ImageButton
ImageButton是显示图片的图像按钮,但它继承自ImageView, 而非继承Button
ImageButton 和 Button之间的区别:
Button既可显示文本也可显示图片,ImageButton只能显示图片不能显示文本。ImageButton上的图像可按比例缩放,而Button通过背景设置的图像会拉伸变形- Button只能靠背景显示一张图片,而ImageButton可分别在前景和背景显示图片,从而实现两张图片的叠加效果
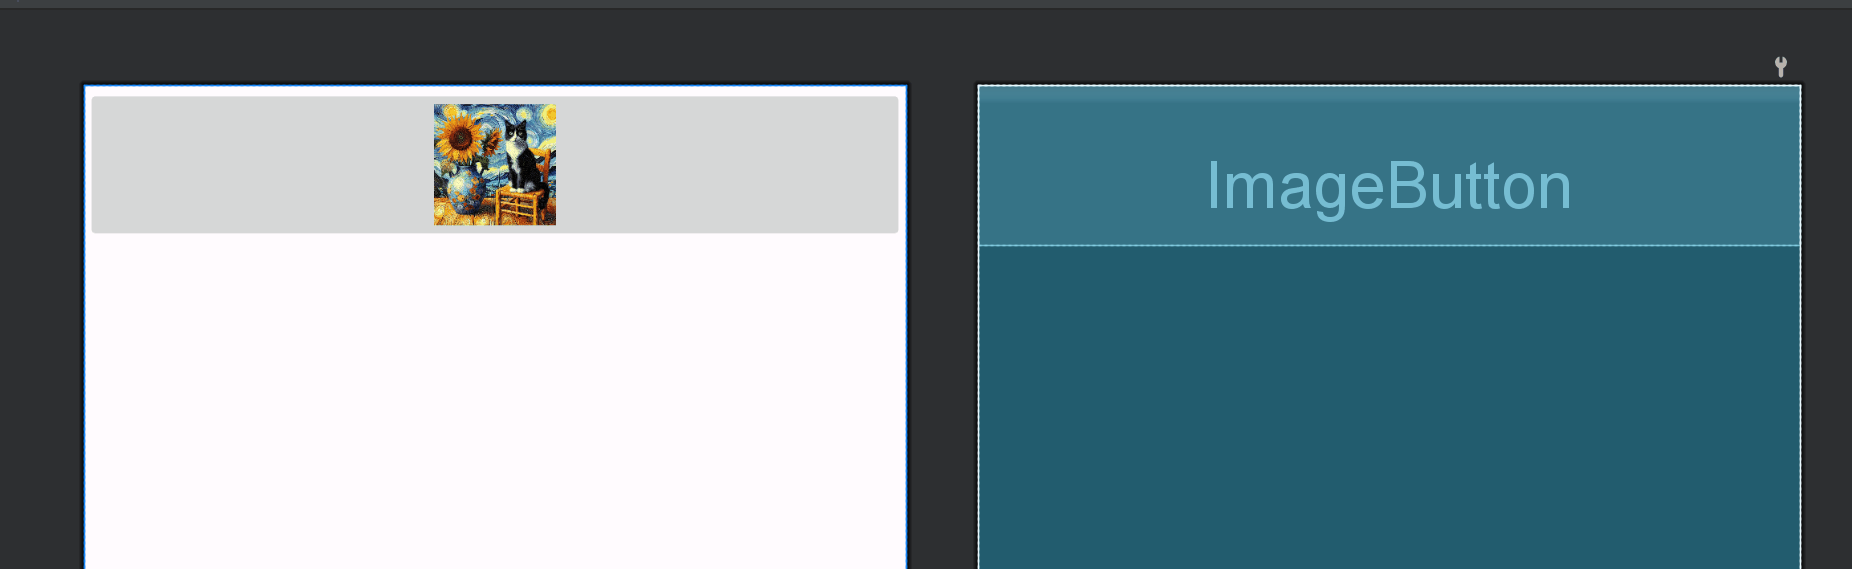
    <ImageButton
        android:layout_width="match_parent"
        android:layout_height="80dp"
        android:src="@drawable/cat"
        android:scaleType="fitCenter"
        ></ImageButton>
同时展示文本与图像
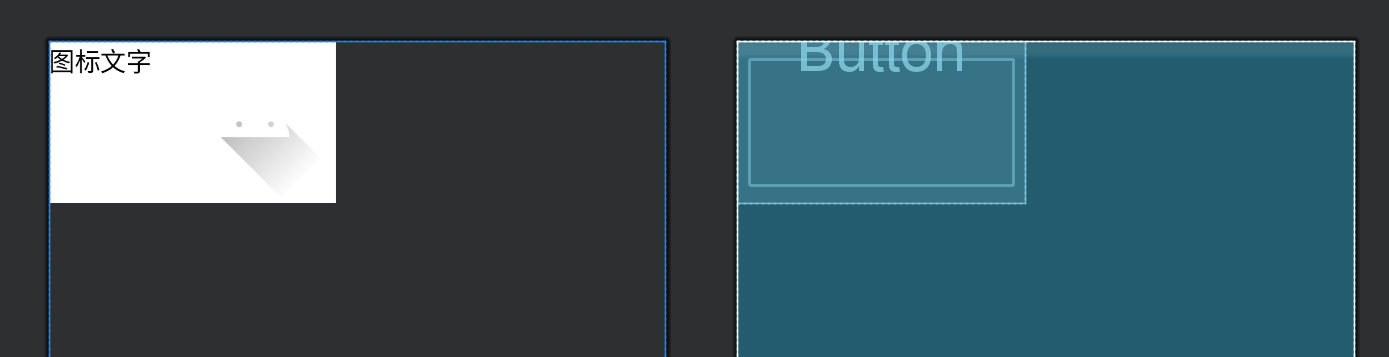
XML 文件
    <Button
        android:layout_width="wrap_content"
        android:layout_height="wrap_content"
        android:background="#ffffffff"
        android:drawableRight="@drawable/ic_launcher_foreground"
        android:drawablePadding="15dp"
        android:text="图标文字"
        android:textSize="17sp" />
- 坚持,一定要坚持下去,持续投入,一万小时定律
- 有困难了就停下来想一想
- 接受痛苦, 战胜痛苦