Java Web开发(5)
MyBatis
- MyBatis是一款优秀的持久层框架,用于简化JDBC的开发。
使用Mybatis查询所有用户数据
-
创建SpringBoot工程, 数据库表user, 实体类User
-
引入Mybatis的相关依赖,配置Mybatis
-
        <dependency>
            <groupId>org.mybatis.spring.boot</groupId>
            <artifactId>mybatis-spring-boot-starter-test</artifactId>
            <version>3.0.3</version>
            <scope>test</scope>
        </dependency>
-
-
编写SQL语句(注解/XML)
遇到的Bug
在mybatisquickstart 中的MybatisQuickstartApplication.java添加下面这一行
@MapperScan("com.showguan.mapper") // 添加这一行
package com.showguan.mybatisquickstart;

import org.mybatis.spring.annotation.MapperScan;
import org.springframework.boot.SpringApplication;
import org.springframework.boot.autoconfigure.SpringBootApplication;

@SpringBootApplication
@MapperScan("com.showguan.mapper")  // 添加这一行
public class MybatisQuickstartApplication {

    public static void main(String[] args) {
        SpringApplication.run(MybatisQuickstartApplication.class, args);
    }

}
JDBC
JDBC:(Java DataBase Connectivity), 就是使用Java语言操作关系型数据库的一套API。
本质:
- Sun公司官方定义的一套操作所有关系型数据库的规范, 即接口
- 各个数据库厂商去实现这套接口,提供数据库驱动jar包
- 我们可以使用这套接口(JDBC)编程, 真正执行的代码是驱动jar包中的实现类
数据库连接池
- 数据库连接池是一个容器,负责分配,管理数据库连接(Connection)
- 它允许应用程序重复使用一个现有的数据库连接,而不是再重新建立一个
- 释放空闲时间超过最大空闲时间的连接,来避免因为没有释放连接而引起的数据库连接遗漏
标准接口:DataSource
- 官方提供的数据库连接池接口,由第三方组织实现此接口
- 功能:获取连接
Druid(德鲁伊), Hikari
Lombok
- Lombok是一个实用的Java类库, 能通过注解的形式自动生成构造器,
getter/setter,equals,hashcode,toString等方法, 并可以自动化生成日志变量, 简化Java开发, 提高效率。
        <dependency>
            <groupId>org.projectlombok</groupId>
            <artifactId>lombok</artifactId>
        </dependency>
| 注解 | 作用 |
|---|---|
| @Getter/Setter | 为所有的属性提供get/set方法 |
| @ToString | 会给类自动生成易阅读的toString方法 |
| @EqualsAndHashCode | 根据类所拥有的非静态字段自动重写equals方法和hashCode方法 |
| @Data | 提供更综合的生成代码功能(@Getter + @Setter + @ToString + @EqualsAndHashCode) |
| @NoArgsConstructor | 为实体类生成无参数的构造器方法 |
| @AllArgsConstructor | 为实体类生成除了static修饰的字段之外的带有各参数的构造器方法 |
Mybatis基础操作
删除和新增操作
MybatisCrudApplicationTests
@SpringBootTest
class MybatisCrudApplicationTests {

    @Autowired
    private EmpMapper empMapper;

    @Test
    public void testDelete() {
        int delete = empMapper.delete(17);
        System.out.println(delete);
    }
    @Test
    public void testInsert(){
        Emp emp = new Emp(152, "Tom1", "0303", "Tom", (short)1, "1.jpg", (short)1, LocalDate.of(2001, 3, 4), 1, LocalDateTime.now(), LocalDateTime.now());
        empMapper.insert(emp);
        System.out.println(emp.getId());
    }
}
application.properties
spring.datasource.driver-class-name=com.mysql.cj.jdbc.Driver
spring.datasource.url=jdbc:mysql://localhost:3306/mybatis
spring.datasource.username=root
spring.datasource.password=20230205.ken


#配置mybatis的日志, 指定输出到控制台
mybatis.configuration.log-impl=org.apache.ibatis.logging.stdout.StdOutImpl

#开启mybatis的驼峰命名自动映射开关 a_column ------> aCloumn
mybatis.configuration.map-underscore-to-camel-case=true
Emp.java
package com.showguan.pojo;

import lombok.AllArgsConstructor;
import lombok.Data;
import lombok.NoArgsConstructor;

import java.time.LocalDate;
import java.time.LocalDateTime;

@Data
@NoArgsConstructor
@AllArgsConstructor
public class Emp {
    private Integer id;
    private String username;
    private String password;
    private String name;
    private Short gender;
    private String image;
    private Short job;
    private LocalDate entrydate;
    private Integer deptId;
    private LocalDateTime createTime;
    private LocalDateTime updateTime;
}
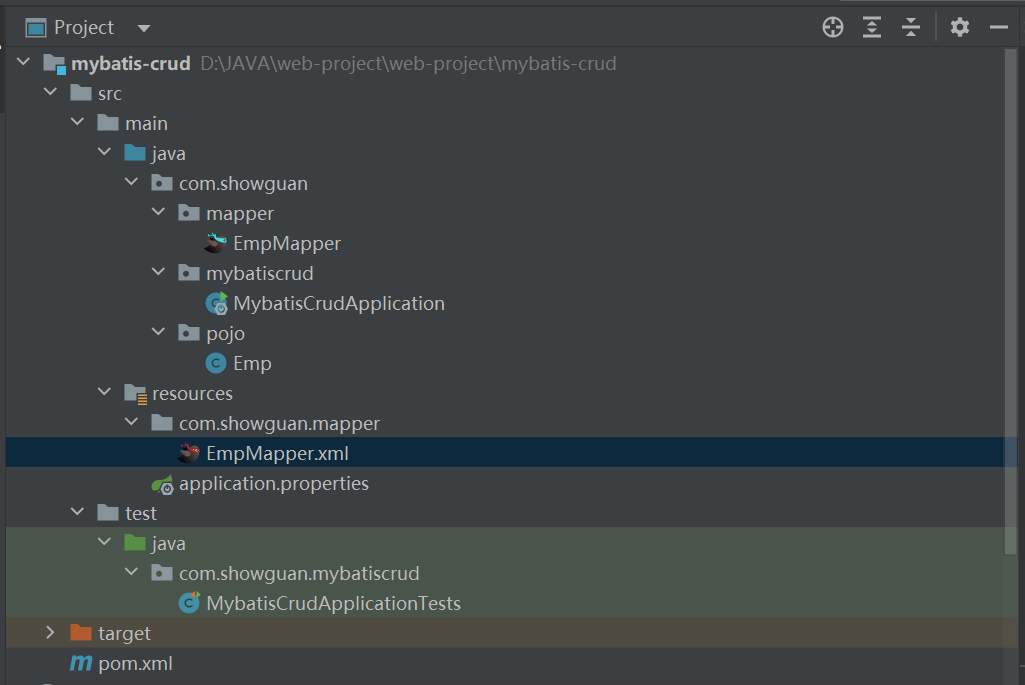
MybatisCrudApplication.java
package com.showguan.mybatiscrud;

import org.mybatis.spring.annotation.MapperScan;
import org.springframework.boot.SpringApplication;
import org.springframework.boot.autoconfigure.SpringBootApplication;

@SpringBootApplication
@MapperScan("com.showguan.mapper")  // 添加这一行
public class MybatisCrudApplication {

    public static void main(String[] args) {
        SpringApplication.run(MybatisCrudApplication.class, args);
    }

}
EmpMapper.java(定义为接口)
package com.showguan.mapper;

import com.showguan.pojo.Emp;
import org.apache.ibatis.annotations.*;

@Mapper
public interface EmpMapper {
    @Delete("delete from emp where id = #{id}")
//    public void delete(Integer id);
    public int delete(Integer id); // 定义为int返回值, 获取删除的个数信息

    @Insert("insert into emp(id, username, password, name, gender, image, job, entrydate, dept_id, create_time, update_time)\n" +
            "        values (#{id}, #{username}, #{password}, #{name}, #{gender}, #{image}, #{job}, #{entrydate}, #{deptId}, #{createTime}, #{updateTime});")
    public void insert(Emp emp);
}
注意事项
- 如果
mapper接口方法形参中只有一个普通类型的参数, #{ }里面的属性名可以随便写, 如 :#{id},#{xxx}(推荐保持一致)
预编译SQL
优势:
- 性能更高
- 更安全(放置SQL注入)
SQL注入
- SQL注入是通过操作输入的数据来修改事先定义好的SQL语句, 以达到执行代码对服务器进行攻击的方法。
面试题 : 参数占位符
- #{…}
- 执行SQL时, 会将#{…}替换为?, 生成预编译SQL, 会自动设置参数值
- 使用时机:参数传递, 都使用{…}
- ${…}
- 拼接SQL。直接将参数拼接再SQL语句中,存在SQL注入问题
- 使用时机:如果对表名,列表进行动态设置时使用
数据封装
- 起别名:在SQL语句中,对不一样的列名起别名,别名和实体类属性名一样
    @Select("select id, username, password, name, gender, image, job, entrydate, dept_id deptId, create_time createTime, update_time updateTime from emp where id = #{id}")
    public Emp getById(Integer id);
- 手动结果映射:通过 @Results 及 @Result 进行手动结果映射
    @Select("select * from emp where id = #{id}")
    @Results({
            @Result(column = "dept_id", property = "deptId"),
            @Result(column = "create_time", property = "createTime"),
            @Result(column = "update_time", property = "updateTime")
    })
    public Emp getById(Integer id);
-
开启驼峰命名:如果字段名和属性名称符合驼峰命名规则, mybatis会自动通过驼峰命名规则映射
-
#开启mybatis的驼峰命名自动映射开关 a_column ------> aCloumn
mybatis.configuration.map-underscore-to-camel-case=true
mybatis 查询
    @Select("select * from emp where id = #{id}")
    public Emp getById(Integer id);

//    @Select("select id, username, password, name, gender, image, job, entrydate, dept_id deptId, create_time createTime, update_time updateTime from emp where id = #{id}")
//    public Emp getById(Integer id);


//    @Select("select * from emp where id = #{id}")
//    @Results({
//            @Result(column = "dept_id", property = "deptId"),
//            @Result(column = "create_time", property = "createTime"),
//            @Result(column = "update_time", property = "updateTime")
//    })
//    public Emp getById(Integer id);
// 使用${}
//    @Select("select *\n" +
//            "from emp\n" +
//            "where name like '%${name}%'\n" +
//            "  and gender = #{gender}\n" +
//            "  and entrydate between #{begin}\n" +
//            "    and #{end}\n" +
//            "order by update_time")
//    public List<Emp> list(String name, Short gender, LocalDate begin, LocalDate end);

    //解决上面的 #{}出现在引号之内
    @Select("select *\n" +
            "from emp\n" +
            "where name like concat('%', #{name}, '%')\n" +
            "  and gender = #{gender}\n" +
            "  and entrydate between #{begin}\n" +
            "    and #{end}\n" +
            "order by update_time")
    public List<Emp> list(String name, Short gender, LocalDate begin, LocalDate end);
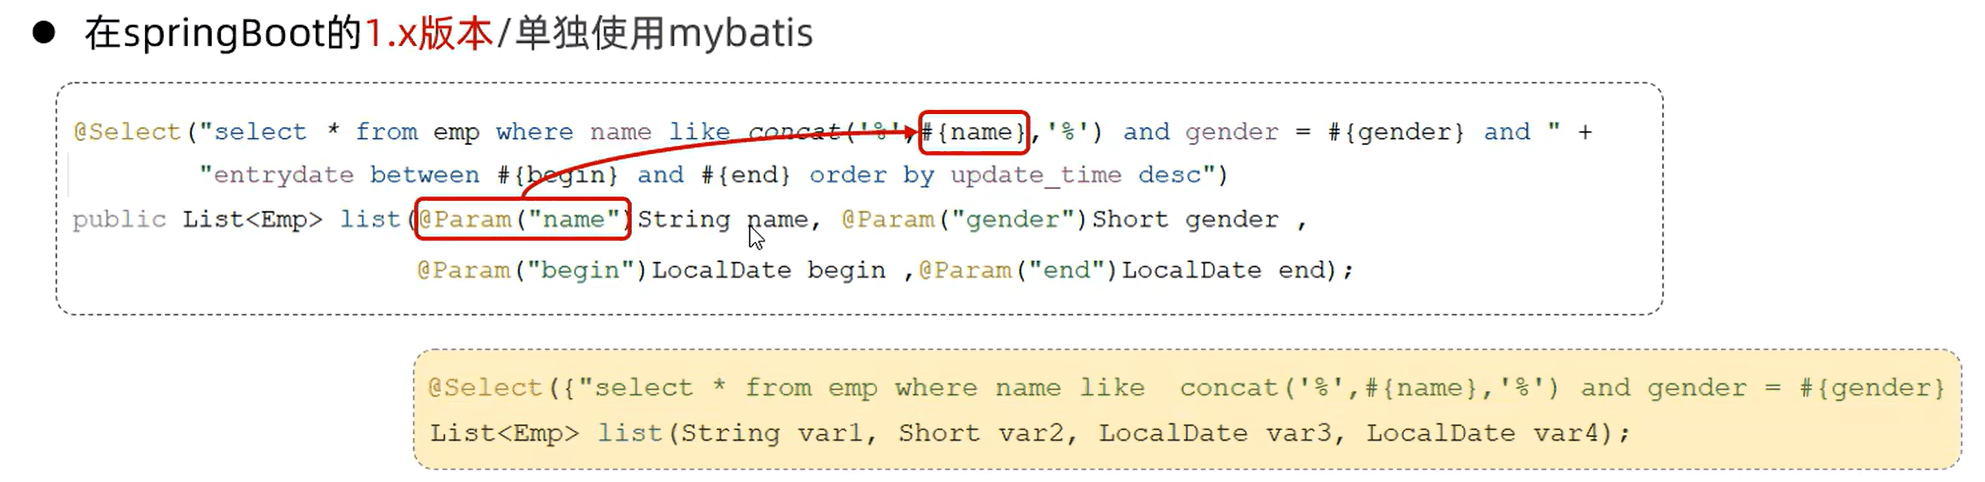
参数名说明
- 在SpringBoot的 1.x 版本中单独使用
mybatis
XML映射文件
规范
XML映射文件的名称与Mapper接口名称一致,并且将XML文件和Mapper接口放置在相同包下(同包同名)XML映射文件的namespace属性为Mapper接口全限定名一致XML映射文件SQL语句的id和Mapper接口的方法名一致,并保持返回类型一致。
<?xml version="1.0" encoding="UTF-8" ?>
<!DOCTYPE mapper
        PUBLIC "-//mybatis.org//DTD Mapper 3.0//EN"
        "http://mybatis.org/dtd/mybatis-3-mapper.dtd">
<mapper namespace="com.showguan.mapper.EmpMapper">
    <select id="list" resultType="com.showguan.pojo.Emp">
        select *
        from emp
        where name like concat('%', '张', '%')
          and gender = 1
          and entrydate between '2000-01-01'
            and '2030-01-01'
        order by update_time;
    </select>
</mapper>
Mybatis动态SQL
查询<if> <where>(可以删除多余的and和or)
<?xml version="1.0" encoding="UTF-8" ?>
<!DOCTYPE mapper
        PUBLIC "-//mybatis.org//DTD Mapper 3.0//EN"
        "http://mybatis.org/dtd/mybatis-3-mapper.dtd">
<mapper namespace="com.showguan.mapper.EmpMapper">
    <select id="list" resultType="com.showguan.pojo.Emp">
        select *
        from emp
        <where>
            <if test="name != null">
                name like concat('%', '张', '%')
            </if>
            <if test="gender != null">
                and gender = 1
            </if>
            <if test="begin != null and end != null">
                and entrydate between '2000-01-01' and '2030-01-01'
            </if>
        </where>
        order by update_time desc;
    </select>
</mapper>
更新<set>(可以删除多余的,)
    <update id="update2">
        update emp
        <set>
        <if test="username != null">
            username = #{username},
        </if>
        <if test="password != null">
            password = #{password},
        </if>
        <if test="name != null">
            name = #{name},
        </if>
        <if test="gender != null">
            gender = #{gender},
        </if>
        <if test="image != null">
            image = #{image},
        </if>
        <if test="job != null">
            job = #{job},
        </if>
        <if test="deptId != null">
            dept_id = #{deptId},
        </if>
        <if test="createTime != null">
            create_time = #{createTime},
        </if>
        <if test="updateTime != null">
            update_time = #{updateTime}
        </if>
        </set>
        where id = #{id};
    </update>
<foreach>
    <delete id="deleteByIds">
        delete
        from emp
        where id in
        <foreach collection="ids" item="id" separator="," open="(" close=")">
        #{id}
        </foreach>;
    </delete>
开发规范-Restful
- REST(REPresentational State Transfer), 表述性状态转换, 它是一种软件架构风格

注意事项:
- REST是风格, 是约定方式,约定不是规定,可以打破
- 描述模块的功能通常使用复数, 也就是加s的格式来描述,表示此类资源,而非单个资源。如:users, emps, books,
接口开发流程
明确需求 接口文档 思路分析 接口开发
接口测试
postman测试 前后端联调
日志小技巧 使用logback记录日志
@Slf4j // 接口
@RestController
查询部门
    /**
     * 查询部分数据
     * @return
     */
//    @RequestMapping(value = "/depts", method = RequestMethod.GET)
    @GetMapping("/depts")
    public Result list(){
        log.info("查询全部");
        List<Dept> deptList = deptService.list();
        return Result.success(deptList);
    }
删除部门
    /**
     * 删除部门数据
     */
    @DeleteMapping("/depts/{id}")
    public Result delete(@PathVariable Integer id){
        log.info("根据id删除部分:{}", id);
        deptService.delete(id);
        return Result.success();
    }
员工查询
易错点:
一定要加@Autowired
PostMan请求,从第一页开始,如果是第0则返回的是查询的数量
    @Autowired
    private EmpMapper empMapper;

//    @Override
//    public PageBean page(Integer page, Integer pageSize) {
//        Long count = empMapper.count();
//
//        Integer start = (page - 1) * pageSize;
//        List<Emp> empList = empMapper.page(start, pageSize);
//        PageBean pageBean = new PageBean(count, empList);
//        return pageBean;
//    }

    @Override
    public PageBean page(Integer page, Integer pageSize,String name, Short gender,LocalDate begin,LocalDate end) {
        //1. 设置分页参数
        PageHelper.startPage(page,pageSize);

        //2. 执行查询
        List<Emp> empList = empMapper.list(name, gender, begin, end);
        Page<Emp> p = (Page<Emp>) empList;

        //3. 封装PageBean对象
        PageBean pageBean = new PageBean(p.getTotal(), p.getResult());
        return pageBean;
    }

    @Override
    public void delete(List<Integer> ids) {
        empMapper.delete(ids);
    }

    @Override
    public void save(Emp emp) {
        emp.setCreateTime(LocalDateTime.now());
        emp.setUpdateTime(LocalDateTime.now());
        empMapper.insert(emp);
    }

    /**
     * 根据id查询员工
     * @param id
     * @return
     */
    @Override
    public Emp getById(Integer id) {
        Emp emp = empMapper.getById(id);
        return emp;
    }

    @Override
    public void modify(Emp emp) {
        emp.setUpdateTime(LocalDateTime.now());
        empMapper.modify(emp);
    }
PageHelper
分页查询时使用PageHelper
        <!--        PageHelper依赖-->
        <dependency>
            <groupId>com.github.pagehelper</groupId>
            <artifactId>pagehelper-spring-boot-starter</artifactId>
            <version>1.4.7</version>
        </dependency>
文件上传
前端:
- 必须要一个表单项
type="file" - 必须是POST请求
method="post" - 编码格式
enctype="multipart/form-data"
<!DOCTYPE html>
<html lang="en">
<head>
    <meta charset="UTF-8">
    <title>上传文件</title>
</head>
<body>

    <form action="/upload" method="post" enctype="multipart/form-data">
        姓名: <input type="text" name="username"><br>
        年龄: <input type="text" name="age"><br>
        头像: <input type="file" name="image"><br>
        <input type="submit" value="提交">
    </form>

</body>
</html>
阿里云OSS
阿里云对象存储OSS(Object Storage Service)
在utils文件夹内编写 AliOSSUtils
package com.showguan.utils;

import com.aliyun.oss.OSS;
import com.aliyun.oss.OSSClientBuilder;
import org.springframework.beans.factory.annotation.Value;
import org.springframework.stereotype.Component;
import org.springframework.web.multipart.MultipartFile;
import java.io.*;
import java.util.UUID;

/**
 * 阿里云 OSS 工具类
 */
@Component
public class AliOSSUtils {

    @Value("${aiyun.oss.endpoint}")
    private String endpoint;
    @Value("${aiyun.oss.accessKeyId}")
    private String accessKeyId ;
    @Value("${aiyun.oss.accessKeySecret}")
    private String accessKeySecret;
    @Value("${aiyun.oss.bucketName}")
    private String bucketName;

    /**
     * 实现上传图片到OSS
     */
    public String upload(MultipartFile file) throws IOException {
        // 获取上传的文件的输入流
        InputStream inputStream = file.getInputStream();

        // 避免文件覆盖
        String originalFilename = file.getOriginalFilename();
        String fileName = UUID.randomUUID().toString() + originalFilename.substring(originalFilename.lastIndexOf("."));

        //上传文件到 OSS
        OSS ossClient = new OSSClientBuilder().build(endpoint, accessKeyId, accessKeySecret);
        ossClient.putObject(bucketName, fileName, inputStream);

        //文件访问路径
        String url = endpoint.split("//")[0] + "//" + bucketName + "." + endpoint.split("//")[1] + "/" + fileName;
        // 关闭ossClient
        ossClient.shutdown();
        return url;// 把上传到oss的路径返回
    }

}
配置文件均配置到properties文件中, 而在AliOSSUtils中用@Value注入
配置文件
-
SpringBoot提供了多种属性配置方式
-
application.properties
-
server.port=8080
server.address=127.0.0.1
-
-
yml/yaml 简洁,数据为中心
-
server: port: 8080 address: 127.0.0.1 -
基本语法
- 大小写敏感
- 数值前必须有空格,作为分隔符
- 使用缩进表示层级关系,缩进时,不允许使用tab键,只能用空格(idea会自动将Tab转换为空格)
- 空格的数目不重要,只要相同层级的元素左侧对齐即可
#表示注释, 从这个字符一直到结尾,都会被解释器忽略。
-
@ConfigurationProperties
在utils中新建文件AliOSSUtilsProperties.java, 编写下面的程序
@Data
@Component
@ConfigurationProperties(prefix = "aliyun.oss")
public class AliOSSUtilsProperties {
    private String endpoint;
    private String accessKeyId;
    private String accessKeySecret;
    private String bucketName;
}
在AliOssutils.java中只需要编写下面的程序即可
    @Autowired
    private AliOSSUtilsProperties aliOSSUtilsProperties;
    /**
     * 实现上传图片到OSS
     */
        String endpoint = aliOSSUtilsProperties.getEndpoint();
        String accessKeyId = aliOSSUtilsProperties.getAccessKeyId();
        String accessKeySecret = aliOSSUtilsProperties.getAccessKeySecret();
        String bucketName = aliOSSUtilsProperties.getBucketName();
和@Value对比
- 相同点
- 都是用来注入外部配置的属性的
- 不同点
@Value注解只能一个一个的进行外部属性的注入。@ConfigurationProperties可以批量的将外部的属性配置注入到bean对象的属性中。
统一拦截
会话技术
-
会话:用户打开浏览器,访问web服务器的资源,会话建立,知道有一方断开连接,会话结束,在一次会话中可以包含多次请求和响应
-
会话跟踪:一种维护浏览器状态的方法,服务器需要识别多次请求是否来自于同一浏览器,以便在同一次会话的多次请求间共享数据
-
会话跟踪技术方案:
- 客户端会话跟踪技术:Cookie
- 服务端会话跟踪技术:Session
- 令牌技术
Cookie
优点:
- HTTP协议中支持的技术
缺点:
- 移动端APP无法使用Cookie
- 不安全, 用户可以自己禁用Cookie
- Cookie不能跨域
- 跨域区分三个维度:协议,IP/域名,端口
    @GetMapping("/cookie1")
    public Result cookie1(HttpServletResponse response){
        response.addCookie(new Cookie("login_username", "Kennem"));
        return Result.success();
    }

    @GetMapping("/cookie2")
    public Result cookie2(HttpServletRequest request){
        Cookie[] cookies = request.getCookies();
        for(Cookie cookie : cookies){
            if(cookie.getName().equals("login_username")){
                System.out.println("login_username: " + cookie.getValue());
            }
        }
        return Result.success();
    }
Session
优点:
- 存储在服务端,安全
- 服务器集群环境下无法直接使用Session
- Cookie的缺点
    @GetMapping("/session1")
    public Result session1(HttpSession httpSession){
        log.info("HttpSession-s1 {}", httpSession.hashCode());

        httpSession.setAttribute("loginUser", "Kennem");
        return Result.success();
    }

    @GetMapping("/session2")
    public Result session2(HttpServletRequest request){
        HttpSession session = request.getSession();
        log.info("HttpSession-s2 {}", session.hashCode());

        Object loginUser = session.getAttribute("loginUser");
        log.info("loginUser {}", loginUser);
        return Result.success(loginUser);
    }
令牌技术
优点:
- 支持PC端,移动端
- 解决集群环境下的认证问题
- 减轻服务端存储压力
缺点:
- 需要自己实现
JWT
- JSON Web Token
- 定义了一种简洁的,自包含的格式,用于在通信双方以json数据格式安全的传输信息。由于数字签名的存在,这些信息时可靠的。
- 组成:
- 第一部分:Header(头),记录令牌类型,签名算法等。例如:{“alg”:“HS256”, “”}
- 第二部分:Payload(有效载荷),携带一些自定义信息,默认信息等。例如:{‘“id”:“1”, “username”:“Tom”}
- 第三部分:Signature(签名),放置Token被篡改,确保安全性。将header,payload, 并加入指定密钥,同过指定签名算法而来。
Base64:是一种基于64个可打印字符(A-Z, a-z, 0-9, + /)来表示二进制数据的编码方式
- 场景:登录认证
- 登录成功后,生成令牌
- 后续的每个请求,都要携带JWT令牌,系统在每次请求处理之前,先校验灵摆,通过后,再处理。
    @Test
    public void testGenJwt(){
        Map<String, Object> claims = new HashMap<>();
        claims.put("id", 1);
        claims.put("name", 2);
        claims.put("company", "xiaomi");

        String jwt = Jwts.builder()
                .signWith(SignatureAlgorithm.HS256, "Kennem")
                .setClaims(claims)
                .setExpiration(new Date(System.currentTimeMillis())) // 设置有效期为一个小时
                .compact();

        System.out.println(jwt);
    }

    @Test
    public void parseJwt(){
        Claims claims = Jwts.parser()
                .setSigningKey("Kennem")
                .parseClaimsJws("eyJhbGciOiJIUzI1NiJ9.eyJuYW1lIjoyLCJjb21wYW55IjoieGlhb21pIiwiaWQiOjEsImV4cCI6MTcxODAwMzMwM30.raK4huIfzd9RY0T3U2a9DGsxHFYLRGYbzTrbqXJabaA")
                .getBody();
        System.out.println(claims);
    }
注意事项:
JWT校验时使用的签名密钥,必须和生成JWT令牌时使用的密钥时配套的。- 如果
JWT令牌解析校验时报错,则说明JWT令牌被篡改或失效了,令牌非法。
过滤器Filter
- Filter过滤器,时Java web三大组件(
Servlet,Filter,Listener)之一 - 过滤器可以把对资源的请求拦截下来,从而实现一些特殊的功能
- 过滤器一般完成一些通用的操作,比如:登录校验、统一编码处理,敏感字符处理等。
//@WebFilter(urlPatterns = "/*")
//@WebFilter(urlPatterns = "/login")
@WebFilter(urlPatterns = "/depts/*")
public class DemoFilter implements Filter {
    @Override
    public void init(FilterConfig filterConfig) throws ServletException {
        System.out.println("Init!");
    }

    @Override
    public void doFilter(ServletRequest servletRequest, ServletResponse servletResponse, FilterChain chain) throws IOException, ServletException {
        System.out.println("Do Fileter!");
        chain.doFilter(servletRequest, servletResponse);
    }

    @Override
    public void destroy() {
        System.out.println("Destroy!");
    }
}
执行流程:
- 请求
->放行前逻辑->放行->资源->放行后逻辑
过滤器链
-
一个Web应用中,可以配置多个过滤器,这多个过滤器形成一个过滤器链
-
顺序:注解配置的Filter,优先级时按照过滤器类名(字符串)的自然排序(字典序)
登录校验
@Slf4j
@WebFilter(urlPatterns = "/*")
public class LoginCheckFilter implements Filter {
    @Override
    public void doFilter(ServletRequest servletRequest, ServletResponse servletResponse, FilterChain filterChain) throws IOException, ServletException {
        HttpServletRequest req = (HttpServletRequest) servletRequest;
        HttpServletResponse resp = (HttpServletResponse) servletResponse;

        String url = req.getRequestURI().toString();
        log.info("请求的url {}", url);

        if(url.contains("login")){
            log.info("登录操作, 放行...");
            filterChain.doFilter(servletRequest, servletResponse);
            return;
        }

        String jwt = req.getHeader("token");

        if(!StringUtils.hasLength(jwt)){
            log.info("请求头token为空, 返回未登录的信息");
            Result error = Result.error("NOT_LOGIN");
            String notLogin = JSONObject.toJSONString(error);
            resp.getWriter().write(notLogin);
            return ;
        }

        try{
            JwtUtils.parseJWT(jwt);
        }catch (Exception e){
            e.printStackTrace();
            log.info("解析令牌失败,返回未登录错误信息");

            Result error = Result.error("NOT_LOGIN"); // 前端收到NOT_LOGIN 会返回到登录界面
            String notLogin = JSONObject.toJSONString(error);
            resp.getWriter().write(notLogin);

            return ;
        }

        log.info("成功登录");
        filterChain.doFilter(servletRequest, servletResponse);

    }
}
拦截器 Interceptor
Spring 提供的, 只能拦截Spring环境中的资源
用来动态拦截控制器方法的执行
- 拦截请求,再指定的方法调用前后,根据业务需要执行预先设定的代码
/* 表示一级路径
/** 表示任意级别的路径
配置需要拦截的路径和不需要拦截的路径
    @Override
    public void addInterceptors(InterceptorRegistry registry) {
        registry.addInterceptor(loginCheckinterceptor).addPathPatterns("/**").excludePathPatterns("/login");
    }
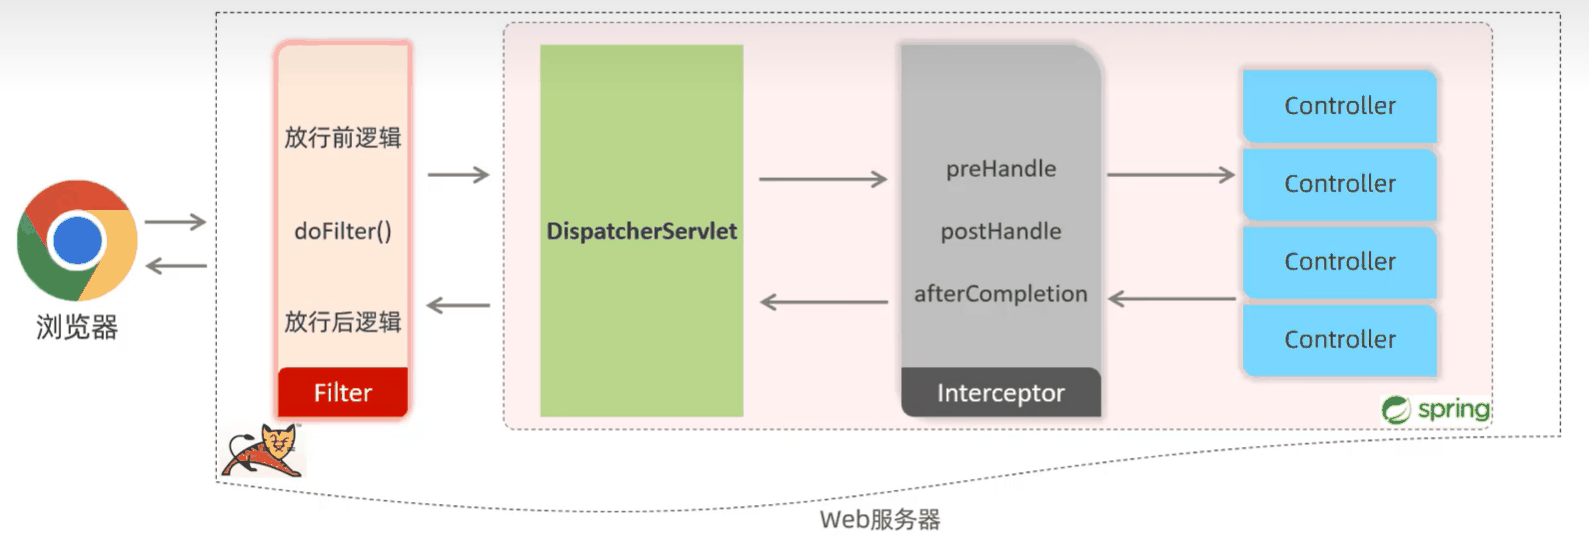
Filter 和 Interceptor
- 接口规范不同:过滤器需要实现
Filter接口,而拦截器需要实现HandlerInterceptor接口 - 拦截范围不同:过滤器Filter会拦截所有的资源,而Interceptor只会拦截Spring环境中的资源。
    @Override // 目标资源方法运行前运行, true:放行 false:不放行
    public boolean preHandle(HttpServletRequest req, HttpServletResponse resp, Object handler) throws Exception {
            String url = req.getRequestURI().toString();
            log.info("请求的url {}", url);

            if(url.contains("login")){
                log.info("登录操作, 放行...");
                return true;
            }

            String jwt = req.getHeader("token");

            if(!StringUtils.hasLength(jwt)){
                log.info("请求头token为空, 返回未登录的信息");
                Result error = Result.error("NOT_LOGIN");
                String notLogin = JSONObject.toJSONString(error);
                resp.getWriter().write(notLogin);
                return false;
            }

            try{
                JwtUtils.parseJWT(jwt);
            }catch (Exception e){
                e.printStackTrace();
                log.info("解析令牌失败,返回未登录错误信息");

                Result error = Result.error("NOT_LOGIN"); // 前端收到NOT_LOGIN 会返回到登录界面
                String notLogin = JSONObject.toJSONString(error);
                resp.getWriter().write(notLogin);

                return false;
            }

            log.info("成功登录");
            return true;
    }

    @Override // 目标资源方法运行后运行
    public void postHandle(HttpServletRequest request, HttpServletResponse response, Object handler, ModelAndView modelAndView) throws Exception {
        System.out.println("postHandle ...");
    }

    @Override // 视图渲染完毕后运行,最后运行
    public void afterCompletion(HttpServletRequest request, HttpServletResponse response, Object handler, Exception ex) throws Exception {
        System.out.println("afterCompletion ...");
    }
异常处理
全局异常处理器
exception/GlobalExceptionHandler
/**
 * 全局异常处理器
 */
@RestControllerAdvice
public class GlobalExceptionHandler{

    @ExceptionHandler(Exception.class)
    public Result ex(Exception ex){
        ex.printStackTrace();
        return Result.error("操作错误!可能的原因:名称重复");
    }

}